Welcome to Smicee
Smicee is an integrated ERP that brings your people, your projects, and your revenue into one system. This documentation covers every module — with screenshots, workflows, and flow diagrams — so your whole team can be productive from day one.
If you're new, start with how Smicee is organized, then pick the role that matches you: new employee, HR or admin, or operations manager. If you're looking for something specific, use the search box in the sidebar.
First time here? The three-path intro below will get you oriented in about five minutes. After that, browse the modules in any order.
How Smicee is organized
Smicee is split into three areas, and most of what you do lives in just one of them.
flowchart LR
    classDef area fill:#fff,stroke:#c8402c,stroke-width:2px,color:#0f1115
    classDef sub fill:#fafaf7,stroke:#e8e6df,color:#3a3f47
    WS["My Workspace
Every employee"]:::area --- WS1[Updates, EOD, Projects]:::sub
    WS --- WS2[Leaves, Tickets, Requisitions]:::sub
    OPS["Operations
Managers"]:::area --- OPS1[Projects, Inventory, Sales]:::sub
    OPS --- OPS2[CRM, Procurement, EOD oversight]:::sub
    HR["HR & Admin
HR and admins"]:::area --- HR1[Employees, Payroll, Policy]:::sub
    HR --- HR2[Attendance, Assets, Training]:::sub
The same record often surfaces in two places from different angles. When an employee submits a leave request in My Workspace → My Leaves, their HR team sees and approves it from HR & Admin → Leave Management. Same data, two views, two audiences.
A quick tour of the three areas
My Workspace is your personal view. Every employee has access. It's where daily work happens — submitting EOD reports, viewing assigned tasks, applying for leave, raising tickets.
Operations is where the business runs. Managers handle projects, inventory, the sales pipeline, CRM, procurement, and team EOD oversight from here.
HR & Admin is the back office. Admins configure the company, define policies, manage employees and payroll, approve leave, track attendance, and log assets.
Your first week as an employee
Everything you need lives under My Workspace. Here's the rhythm.
Four things to do on day one
- Check
My Updates. This is your inbox inside Smicee — notifications, task assignments, leave approvals, and announcements. Make it your first stop each morning. - Submit your first
EOD Report. An End-of-Day report is how you log what you worked on. Go toEOD Report → Submit EOD. - Find your projects. Open
My Projects → Projectsto see what you're assigned to, andMy Projects → Tasksfor today's deadlines. - Know where to go when you need something. Leave →
My Leaves. Technical help →My Tickets. Supplies →My Requisitions. Workplace concerns →My Grievances.
The one habit that matters. Submit your EOD daily. Don't batch a week's worth on Friday — your manager reads these to know where you are and what you need.
Setting up Smicee from zero
Do these in order. Skipping ahead creates problems — you can't run payroll before departments exist, for example.
The setup sequence
flowchart TD
    classDef step fill:#fff,stroke:#c8402c,color:#0f1115
    A[1. Organization Settings
Company identity, weekend, tax IDs]:::step --> B[2. Departments & Designations
Org structure]:::step
    B --> C[3. Policy, Compliance, Holidays
Governance]:::step
    C --> D[4. Onboarding Setup
Bundle policies by boarding type]:::step
    D --> E[5. Payroll Items → Designation Payroll
Salary structure]:::step
    E --> F[6. Employees
Add your first hire]:::step
    F --> G[7. Assign per-employee Payroll
Go live]:::step
Jump to Organization Setup to begin. Once live, your monthly rhythm is: scan Attendance before payroll, approve Leave requests as they come in, and use the Activity Log for audits.
Running the sales pipeline
The pipeline moves left to right. Each stage feeds the next — that's the whole Operations module in one sentence.
flowchart LR
    classDef stage fill:#fff,stroke:#c8402c,color:#0f1115
    classDef optional fill:#f7ecd4,stroke:#8b5a00,color:#0f1115
    L[Lead]:::stage --> C[Client]:::stage --> Q[Quotation]:::stage --> O[Order]:::stage --> CO[Collection]:::stage --> F[Fulfillment]:::stage
    O -.-> R[Return]:::optional
Seven stages, six steps
- Capture a lead in
CRM → Leads. - Convert to a client in
CRM → Clientswhen the deal is serious. Register their business inCRM → Companiesfor B2B. - Draft pricing with
Sales → Quotations— line items, VAT, tax, discount. - Confirm the order via
Sales → Orderswhen the client accepts. - Record payments in
Sales → Sales Collection. The Due Bill view tracks outstanding amounts. - Plan dispatch in
Sales → Fulfillment— batch orders by route and assign vehicles.
In parallel: keep inventory stock accurate, initiate RFPs ahead of need, and review the team's EOD reports each morning.
My Workspace
Your personal view. Ten menu items, each focused on one kind of daily work. Items with a dropdown arrow expand to reveal submenus — items without dropdowns navigate directly.
The ten menu items
Expandable menus: EOD Report, My Projects, My Tickets, My Leaves, My Requisitions. Direct navigation: My Updates, My Trainings, My Grievances, My Assets, My Contact. Expanded items highlight in lavender so you always see the active context.
My Updates
Your inbox inside Smicee. Task assignments, leave approvals, ticket replies, and company-wide announcements land here first.
Make this your first stop each morning. It's the fastest way to catch anything you need to action before getting into deeper work.
EOD Reports
Document your daily activities and progress. EOD (End-of-Day) reports are the primary signal managers use to understand where you are and what you need.
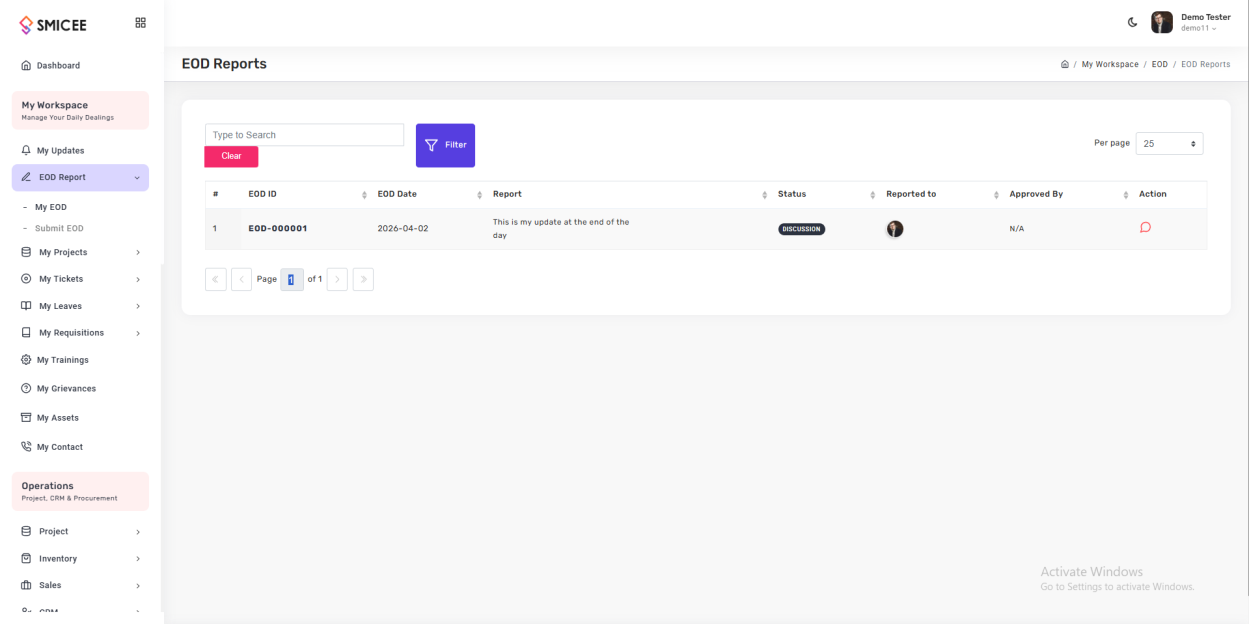
View your past reports
Go to EOD Report → My EOD. You'll see a searchable, filterable table of everything you've submitted — EOD ID, date, status (Discussion, Approved), who you reported to, and who approved it.
Submit a new EOD report
- Click
EOD Report → Submit EOD. - In Reported To, pick your manager.
- In Report Details, describe what you worked on. Use the formatting toolbar for lists, code blocks, or links.
- Click Submit to send, or Save as Draft to finish later.
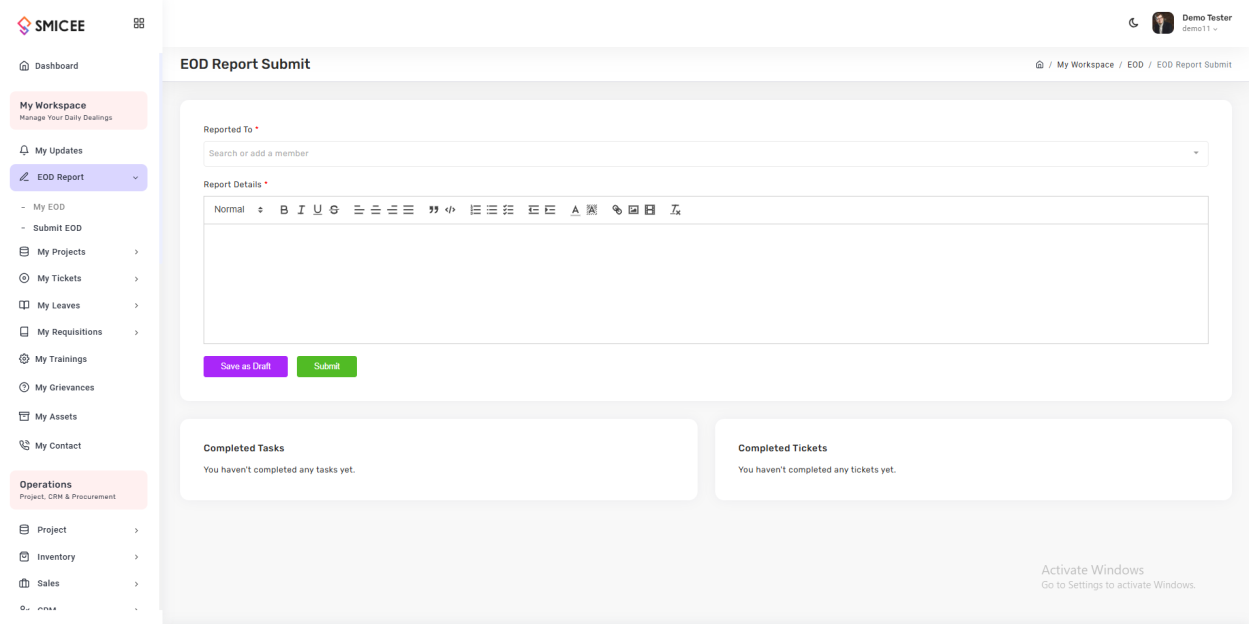
Automatic pull-in. The Completed Tasks and Completed Tickets cards at the bottom of the form populate automatically from your day's activity. You don't need to re-type them.
My Projects & Tasks
See every project you're assigned to, and the tasks due today. Two views, two purposes.
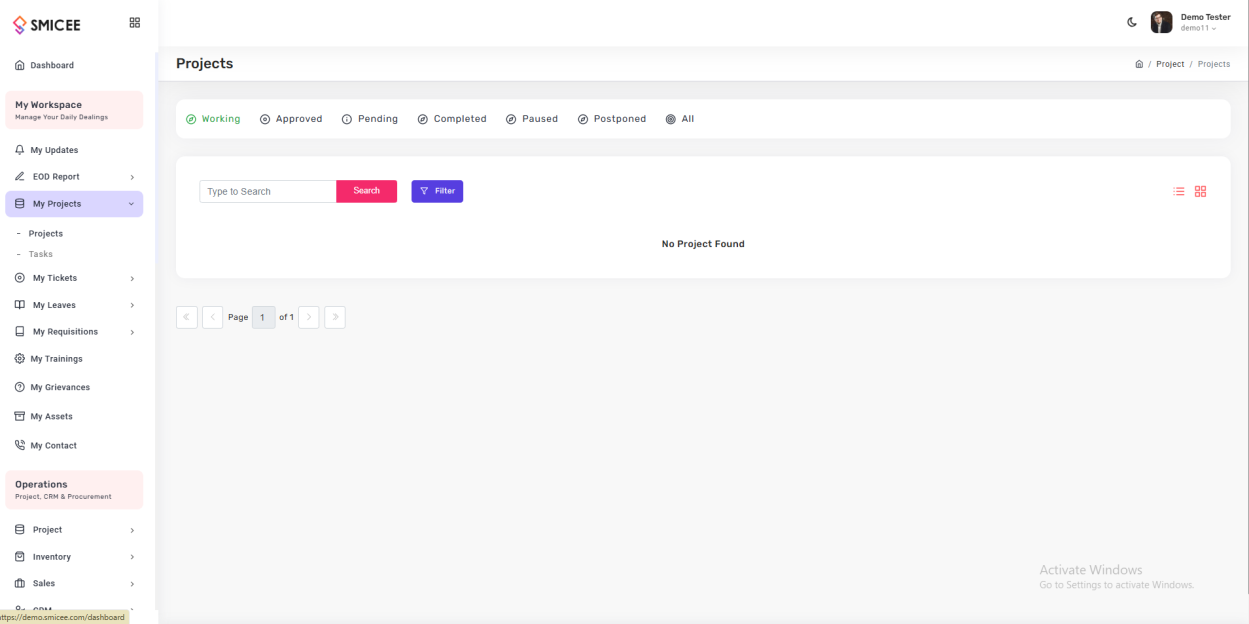
Projects view
Under My Projects → Projects, you'll see all assigned projects filtered by status: Working, Approved, Pending, Completed, Paused, Postponed, or All.
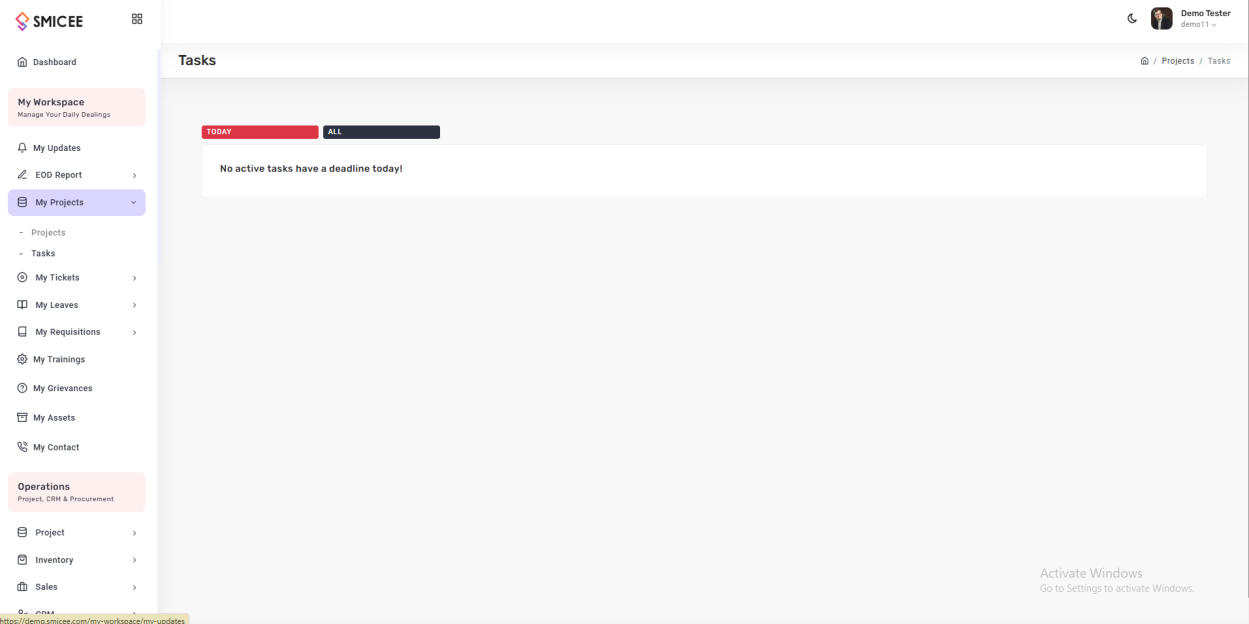
Tasks view
Under My Projects → Tasks, you get a pure focus list — anything with a deadline today under the TODAY tab, everything else under ALL.
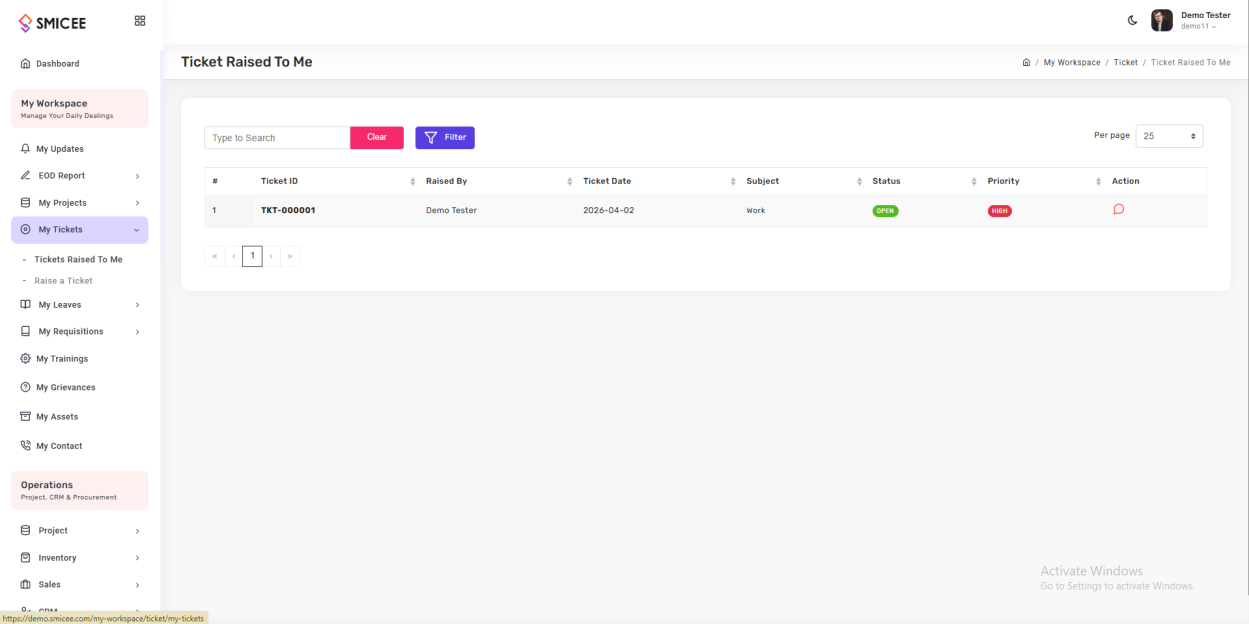
My Tickets
Raise support tickets and manage ones assigned to you. Use this instead of email — tickets are tracked, so nothing gets lost.
Tickets assigned to you
Under My Tickets → Tickets Raised To Me, see every open ticket where you're the resolver. Columns include ID, raised-by, date, subject, status, and priority.
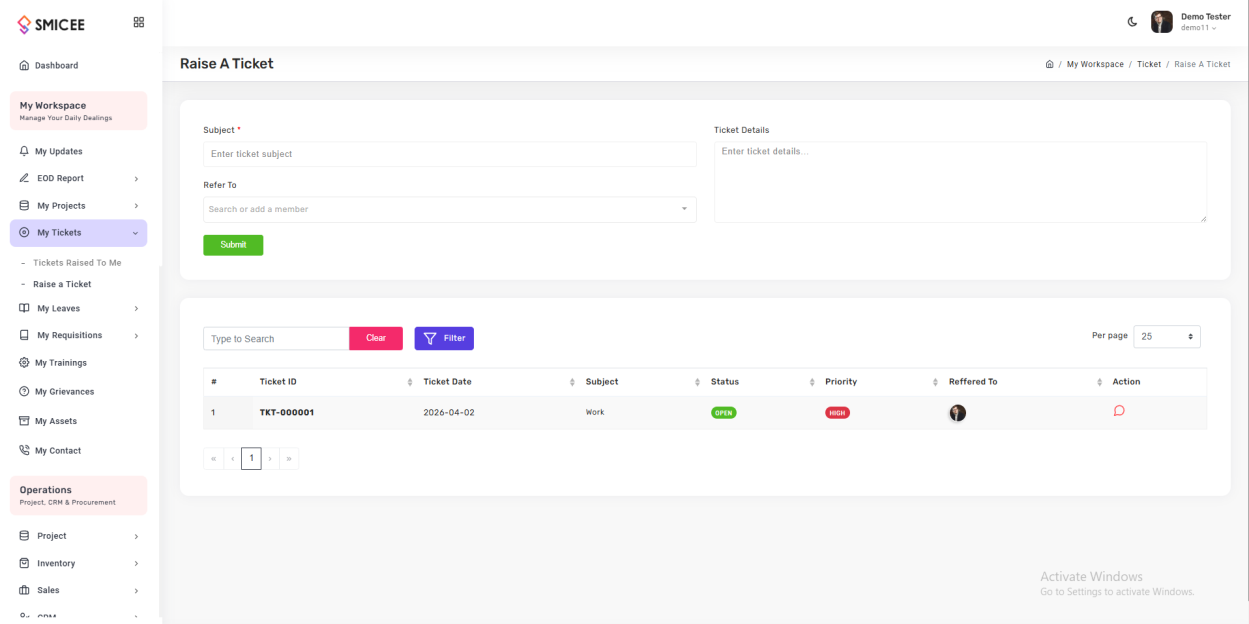
Raise a new ticket
- Click
My Tickets → Raise a Ticket. - Enter Subject and Ticket Details.
- In Refer To, pick the team or person who should handle it.
- Click Submit. Track progress in the same view.
Status and priority flow. Tickets move from Open → Closed, with priority Low → Medium → High. Admins can update either at any time.
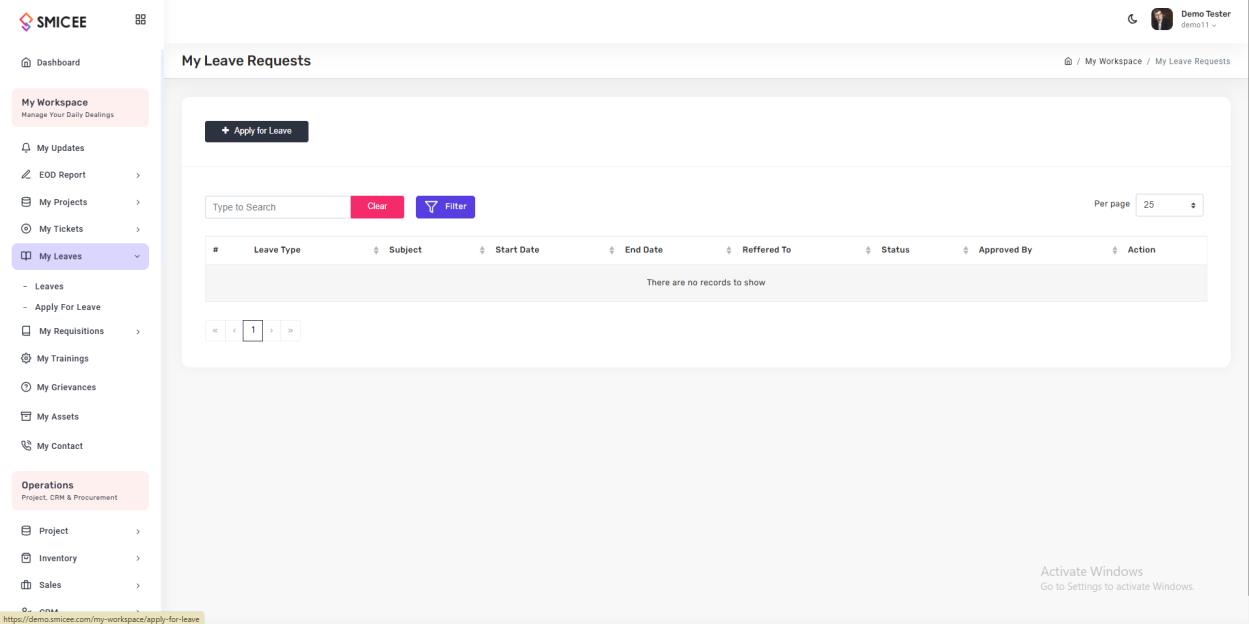
My Leaves
Apply for leave, view your history, and track approval status. The system skips weekends automatically when counting days.
View leave history
My Leaves → Leaves shows every leave application you've made — type, subject, dates, who it was referred to, status, and who approved it.
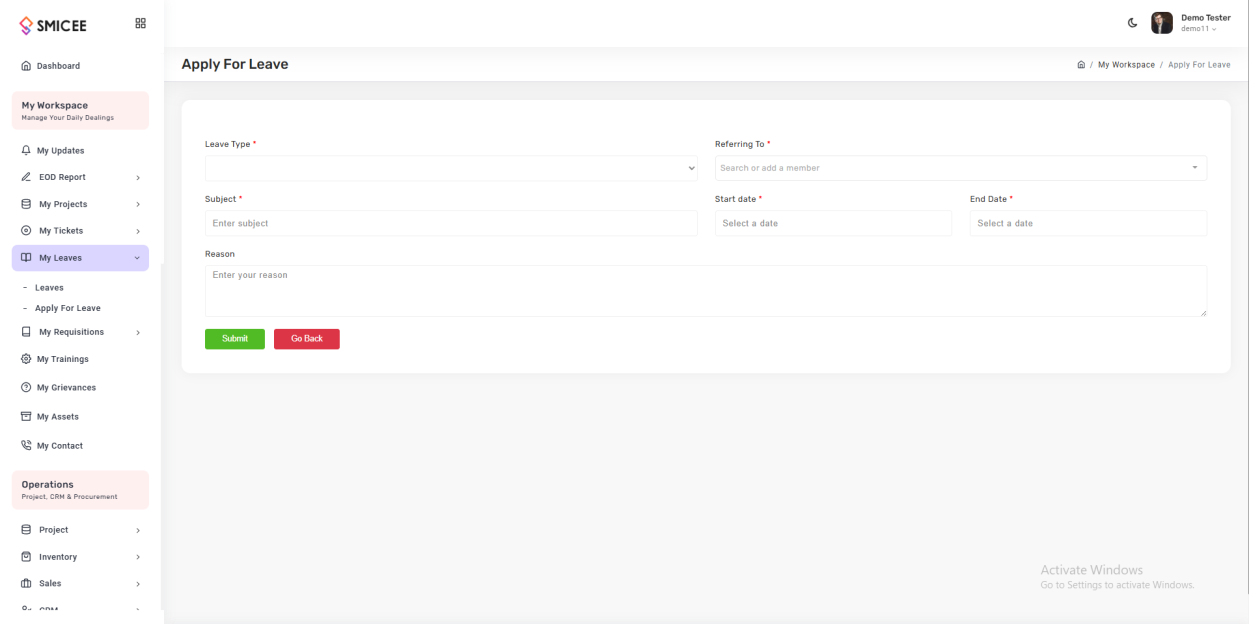
Apply for leave
- Click
My Leaves → Apply For Leave. - Pick Leave Type (Casual, Sick, Annual, or any custom type HR has defined).
- In Referring To, pick the approving manager.
- Set Subject, Start Date, End Date, and a Reason.
- Click Submit.
My Requisitions
Request supplies, equipment, or other resources. Requisitions are itemized — you add line-by-line with quantities and unit prices.
View past requisitions
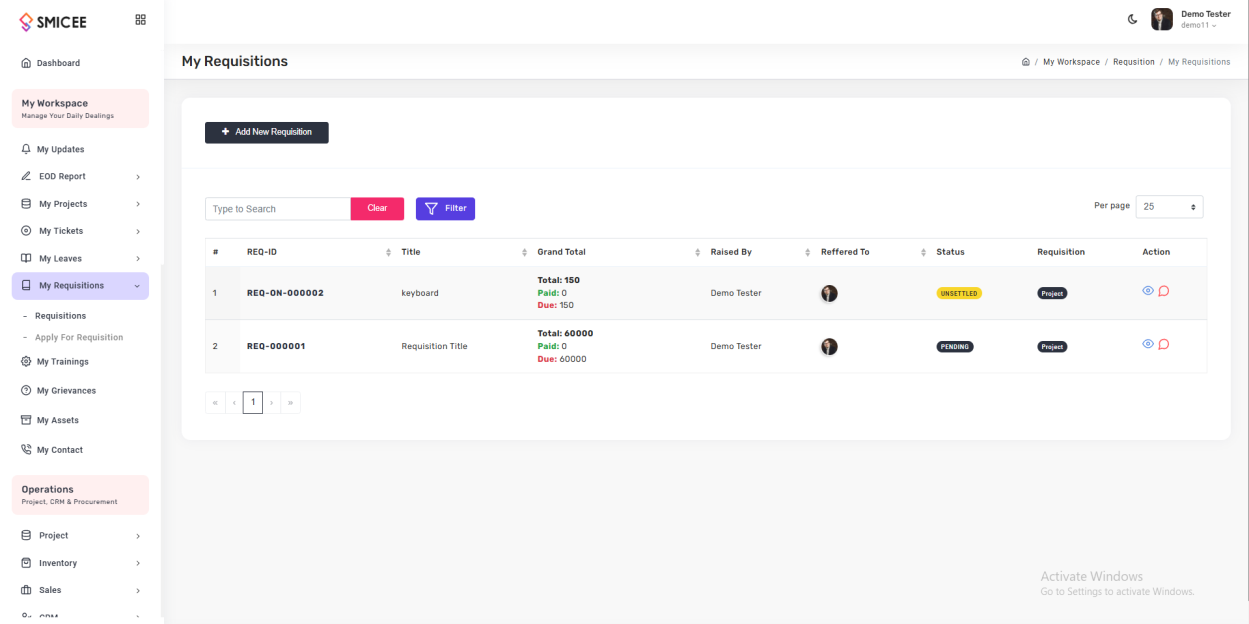
Create a new requisition
- Click
My Requisitions → Apply For Requisition. - Enter Title and pick Refer To, Requisition Type, and Project.
- Add items: each row needs an item name, unit price, and quantity. The Grand Total calculates automatically.
- Add a Note justifying the request if needed.
- Click Create.

Trainings, Grievances, Assets, Contact
Four direct-navigation items in My Workspace. These don't have submenus — click once to reach the page.
My Trainings
Access assigned training courses and learning materials. When HR adds you to a training via Training Management, it appears here.
My Grievances
File workplace complaints privately and formally. Unlike tickets (for IT / admin help), grievances are for sensitive workplace concerns.
My Assets
View company hardware and equipment allocated to you — laptops, phones, vehicles. Allocation is managed by HR in Asset Management.
My Contact
View and update your personal contact details and communication preferences.
Operations
Where the business runs. Six modules cover the complete operational lifecycle — from projects and inventory to the full sales pipeline, CRM, procurement, and team-wide EOD oversight.
The six modules
- Project — Active and archived projects, with type definitions.
- Inventory — Products and categories for your catalog.
- Sales — Quotations, orders, collections, returns, and fulfillment.
- CRM — Leads, clients, and B2B company accounts.
- Procurement — Vendor contacts, vendor lists, and RFP workflows.
- EOD Reports — Team-wide oversight of daily reports.
Project Module
Create, assign, and archive projects. Define the project types your organization uses so every new project is properly classified.
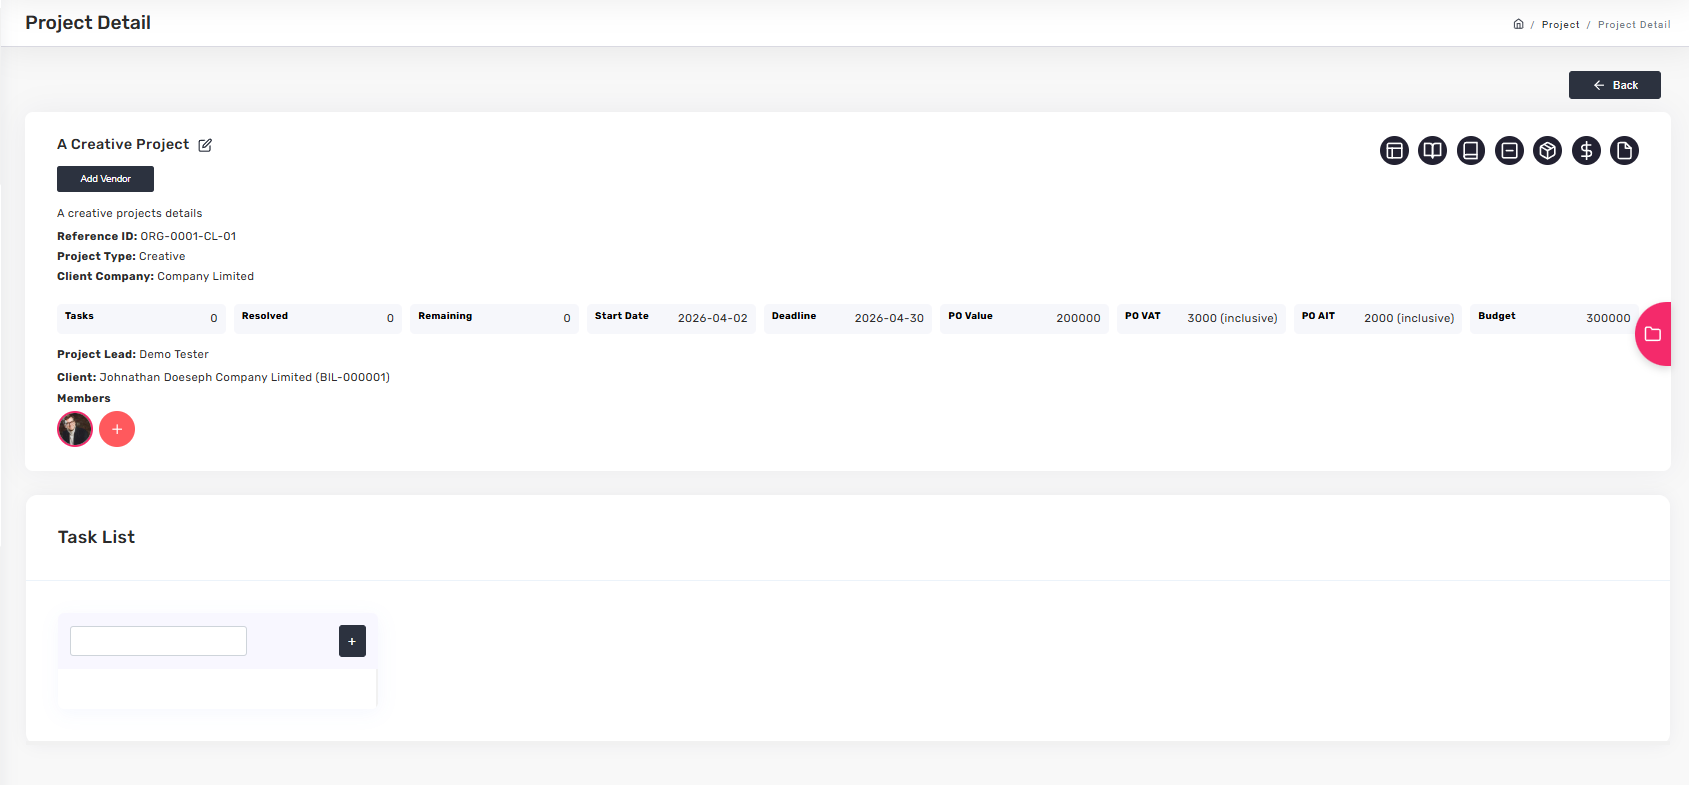
Projects list and detail view
A project detail page shows task count, start/deadline, PO value and VAT/AIT, budget, project lead, client company, and assigned members. Update status here as work progresses.
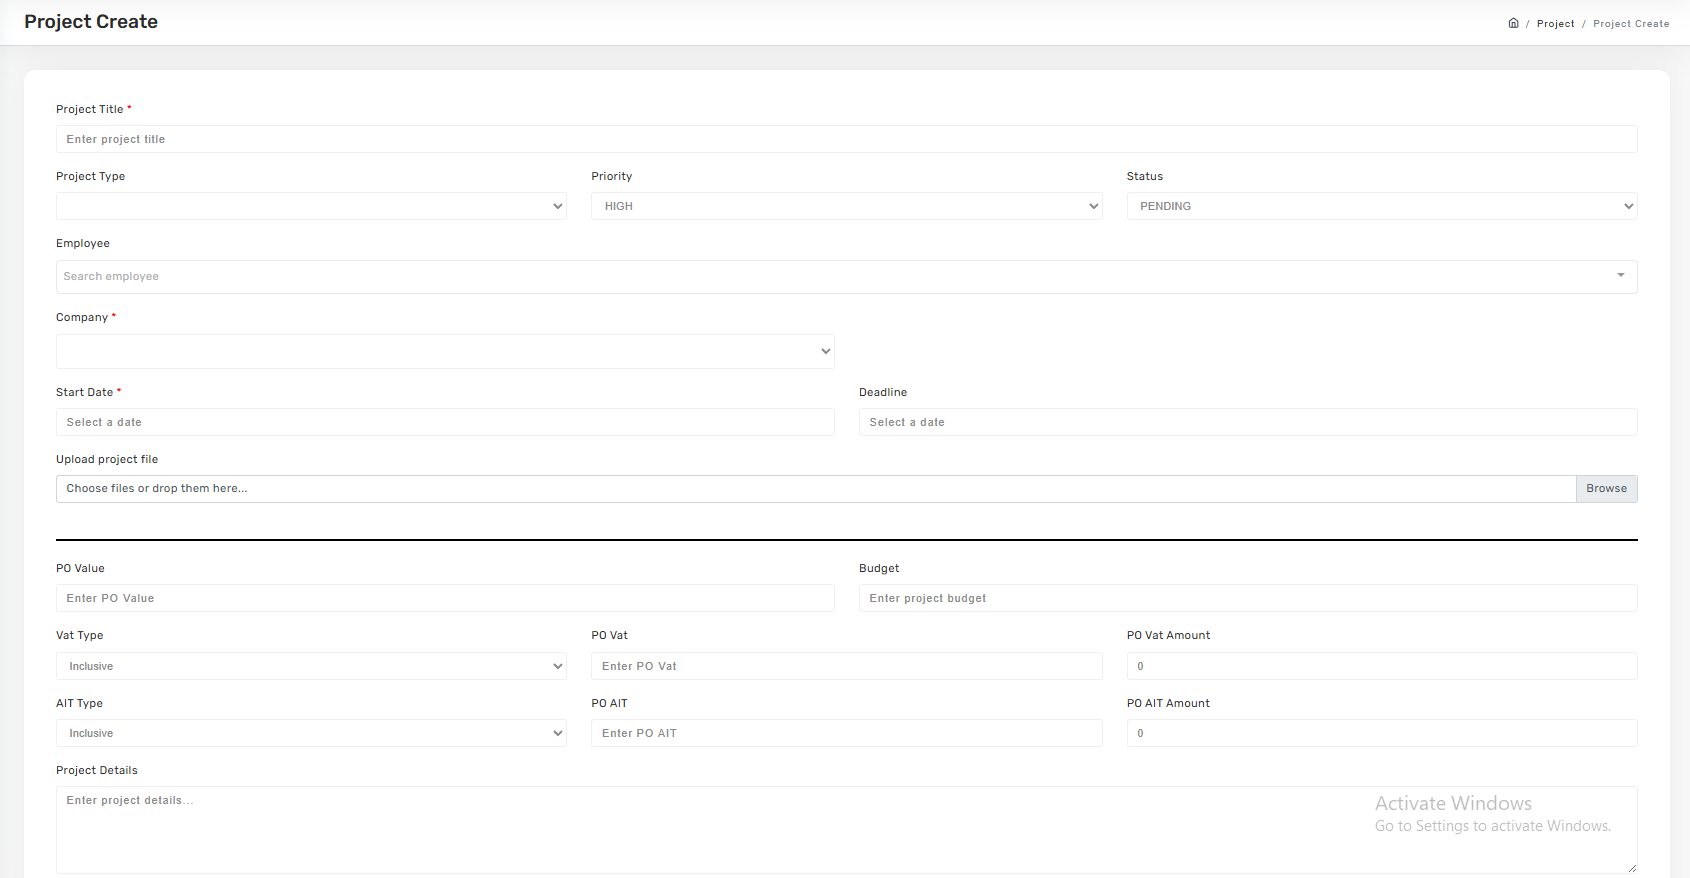
Create a new project
- Go to
Project → Projects → Add New Project. - Fill Title, Project Type, Priority, Status, and assign the Employee lead and Company.
- Set Start Date, Deadline, PO Value, VAT/AIT settings (type, percentage, amount), and Budget.
- Upload any project files and enter Project Details.
- Click Create.
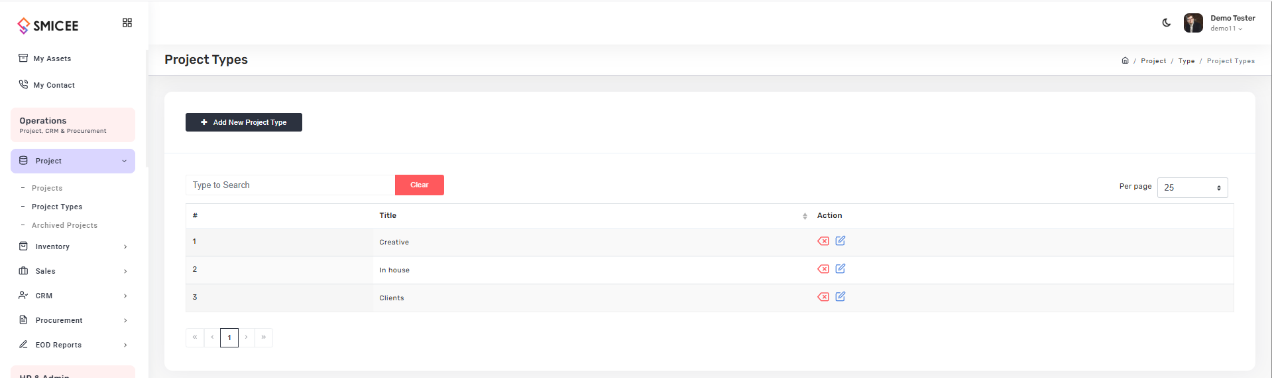
Manage project types
Project Types are the categories (Creative, In-house, Client, etc.) used to classify projects. Set them up before creating projects so classification stays consistent.
Archived projects
When a project is done, archive it to clear the active list while preserving the record for audits and historical reference.
Inventory Module
Manage your product catalog. Categorize items for easier browsing, reporting, and procurement planning.
Products
The products table shows name, SKU, category, subcategory, sell price, stock, tags, and status (Active / Inactive) at a glance.
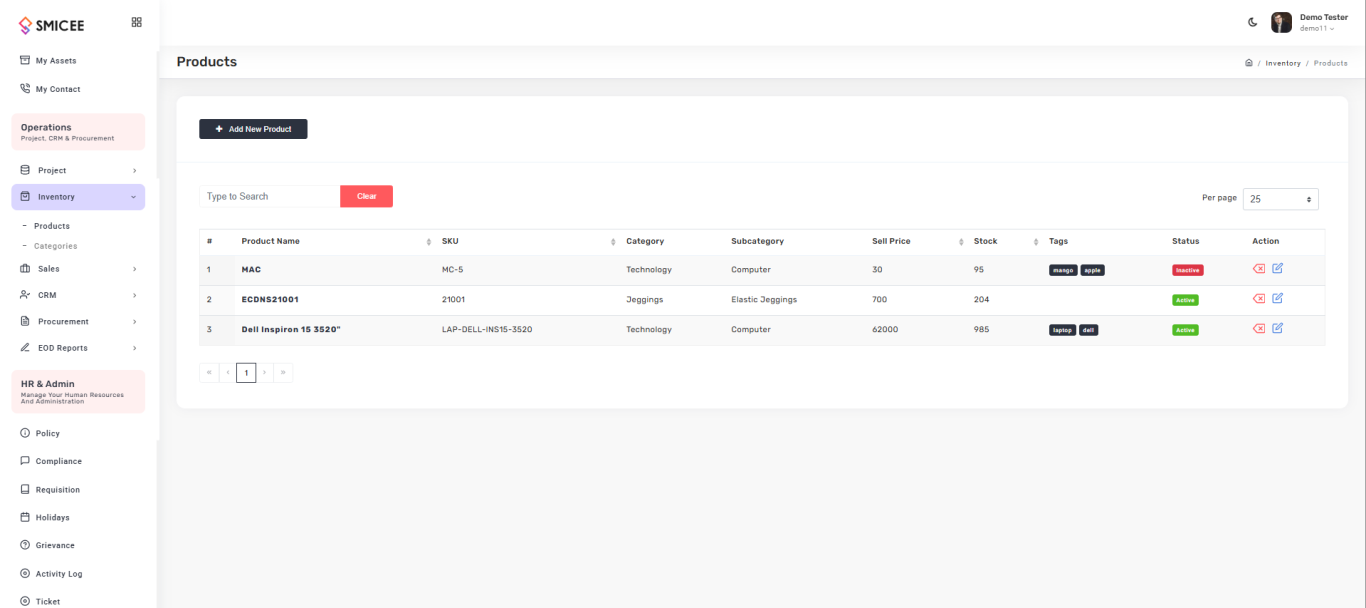
Add a new product
- Click
Inventory → Products → Add New Product. - Fill Name, SKU, Category, Subcategory, and Product Unit.
- Add Brand, Distributor, Origin, and a product description.
- Set Cost Price, Selling Price, Offer Price, and Stock Quantity.
- Upload a photo, add purchase/sell descriptions, and tag the product.
- Click Create.

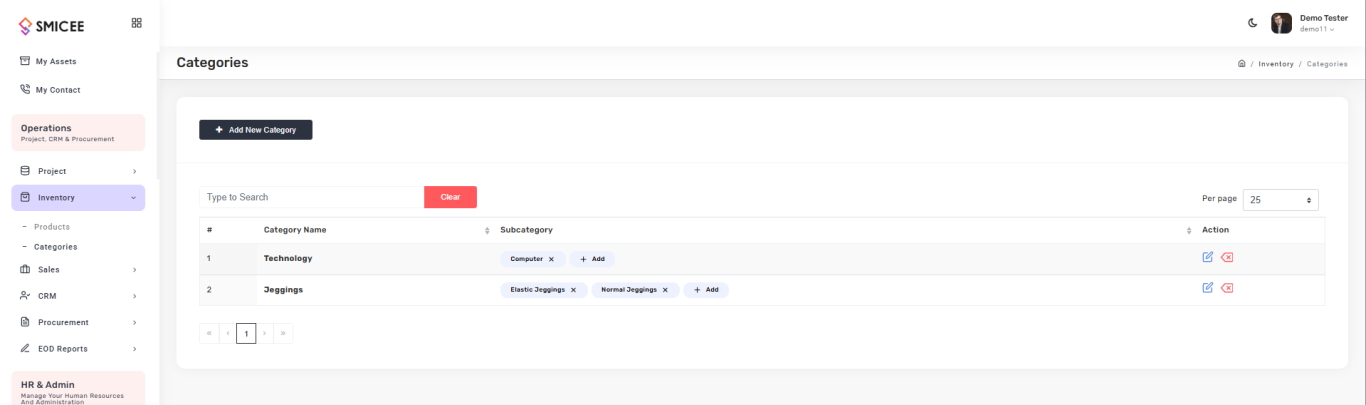
Categories and subcategories
Categories organize your catalog for filtering and reporting. A category can have multiple subcategories (e.g., Technology → Computer, Laptop).
Sales Pipeline
The complete sales lifecycle in one module — from draft quotation to dispatched order. Five submenus, each handling one stage.
flowchart LR
    classDef stage fill:#fff,stroke:#c8402c,color:#0f1115
    classDef optional fill:#f7ecd4,stroke:#8b5a00,color:#0f1115
    Q[Quotations]:::stage --> O[Orders]:::stage --> SC[Sales Collection]:::stage --> F[Fulfillment]:::stage
    O -.-> SR[Sales Return]:::optional
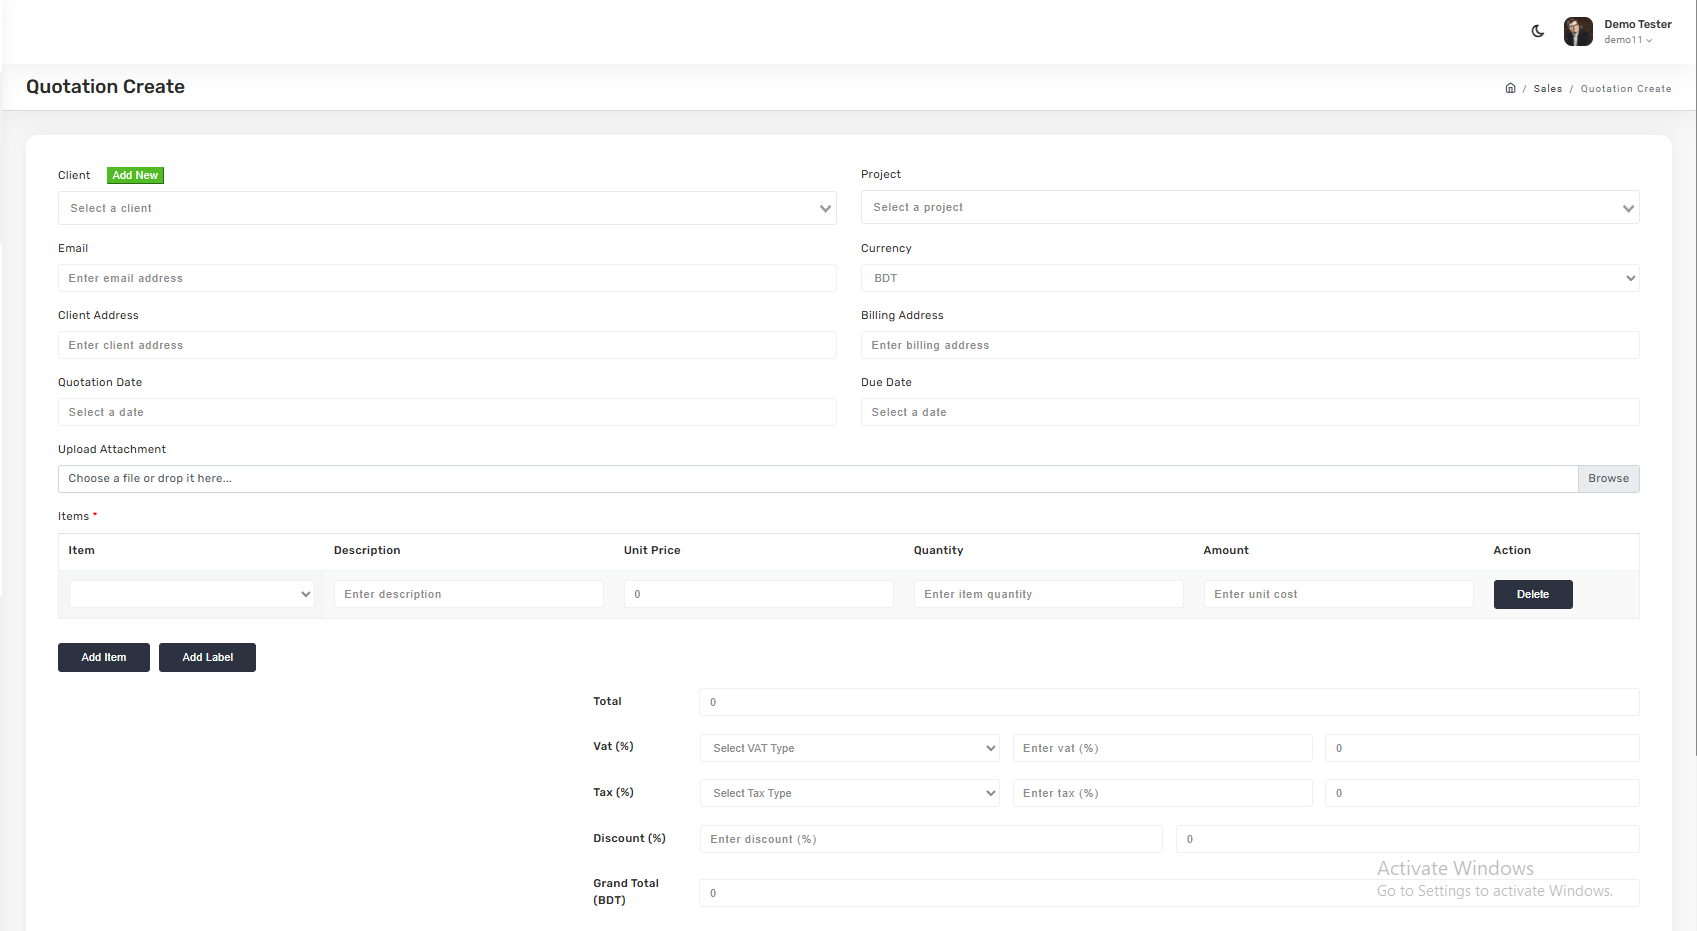
Quotations
Draft pricing for potential customers before they commit. Each quotation is linked to a client and project, with line items, VAT, tax, and discount.
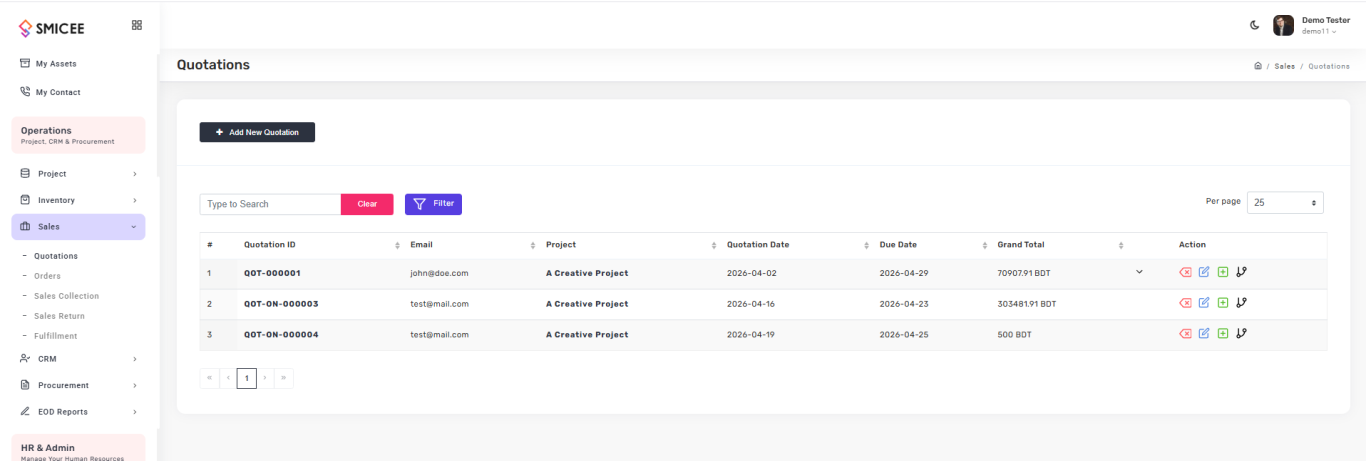
To create a quotation, click Add New Quotation. Pick the Client (or add a new one inline), the Project, billing address, dates, and currency. Add line items with description, unit price, quantity. Apply VAT, Tax, and Discount as percentages — the Grand Total calculates automatically.
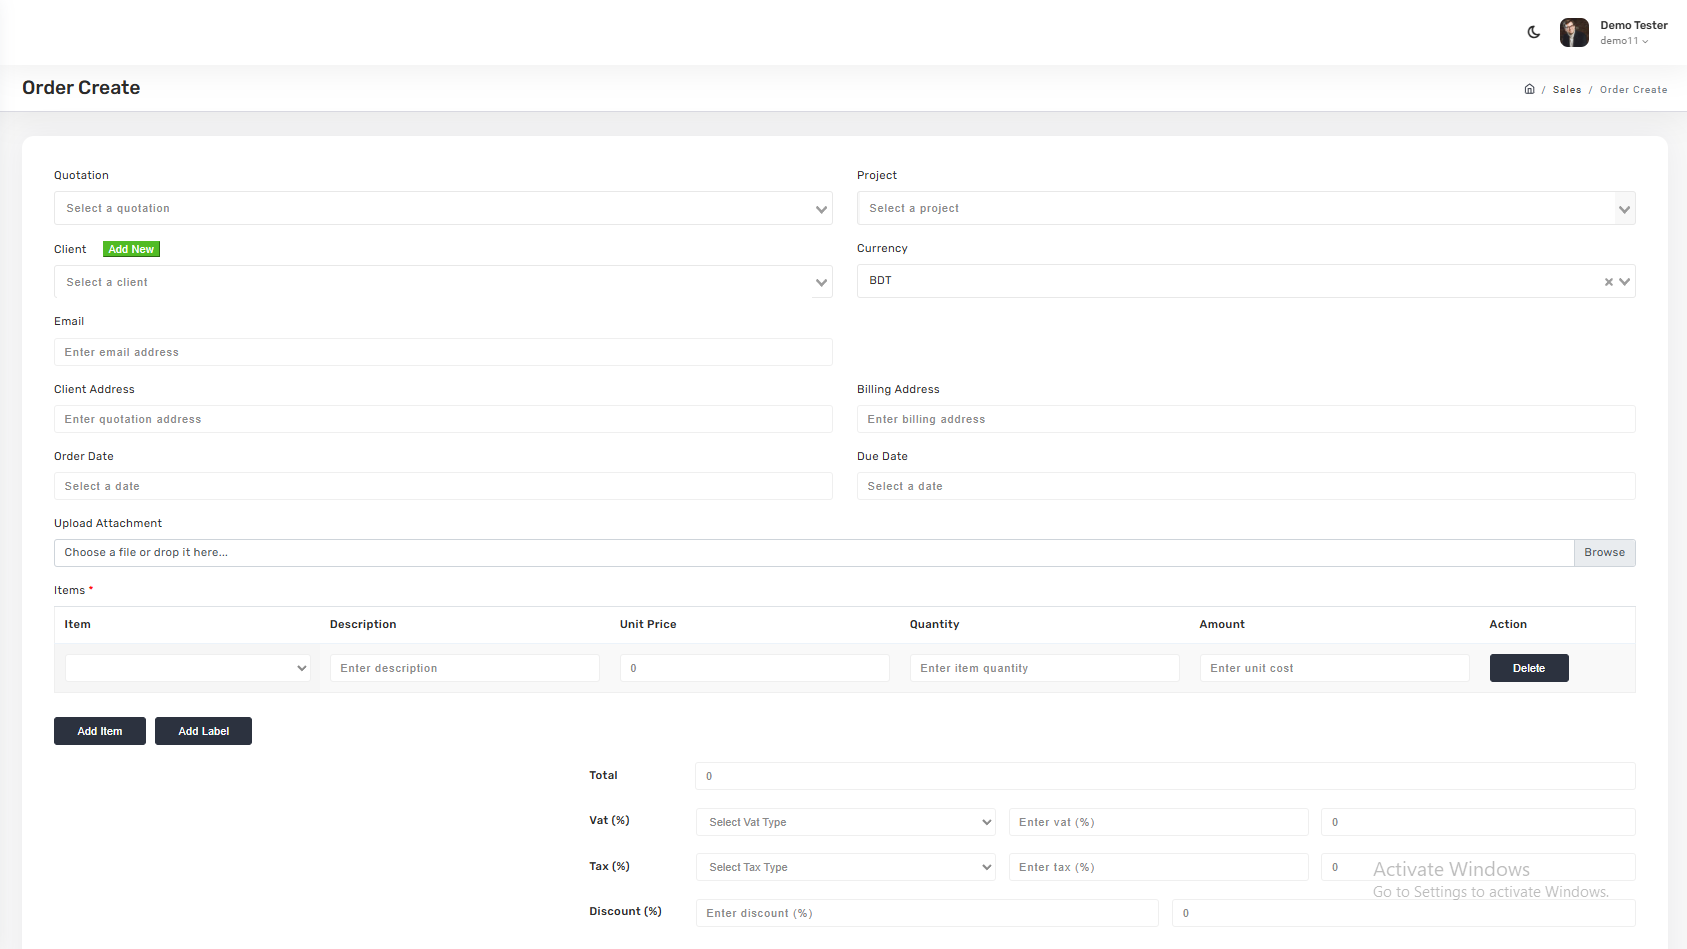
Orders
When the client accepts, convert the quotation into a confirmed order. The order tracks amount, payments (Paid / Due), order date, due date, and status.
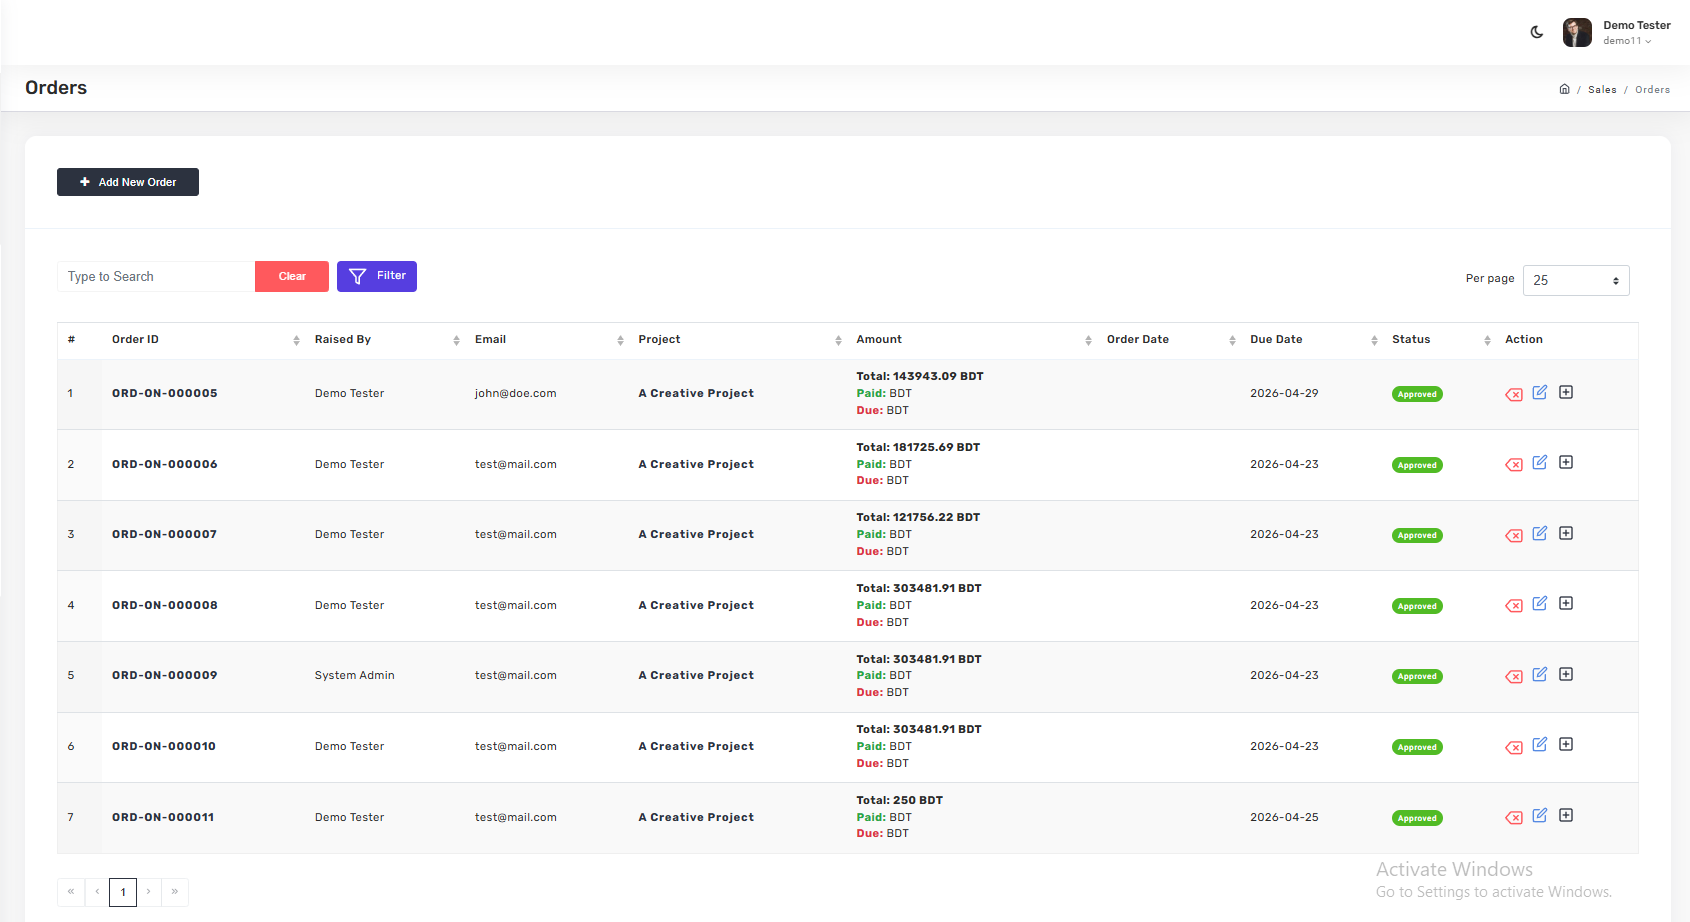
To create an order, click Add New Order, pick the source quotation (or create directly), confirm client / project / dates / items, and submit.
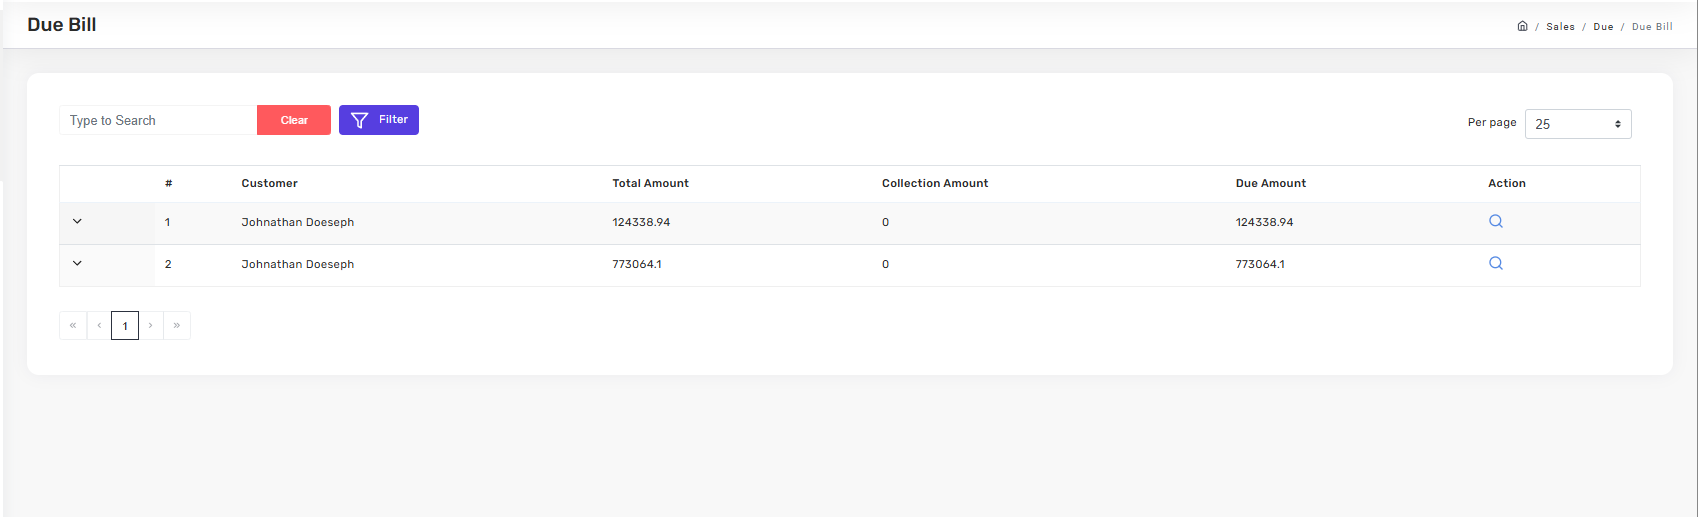
Sales Collection
Record payments as they come in. Each customer row shows total amount invoiced, collection amount received, due amount outstanding, and any return amount.
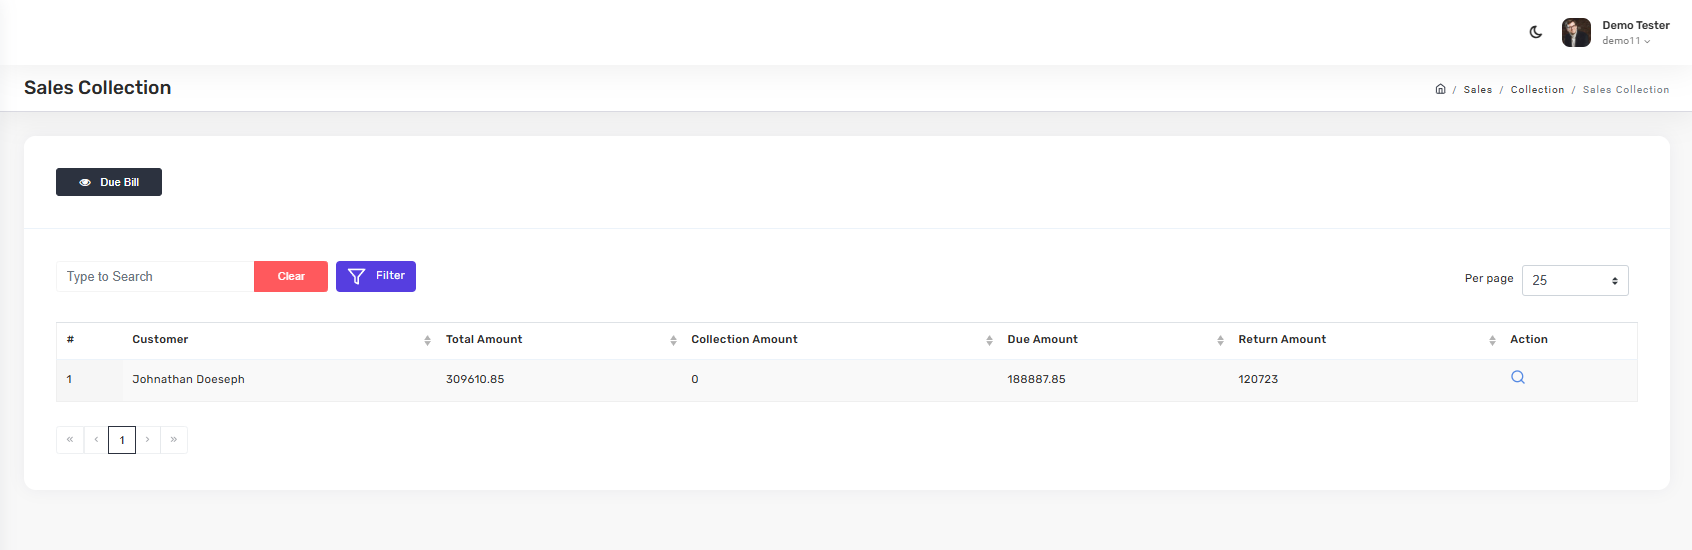
Click Due Bill at the top of the collection view to filter to customers with outstanding amounts.
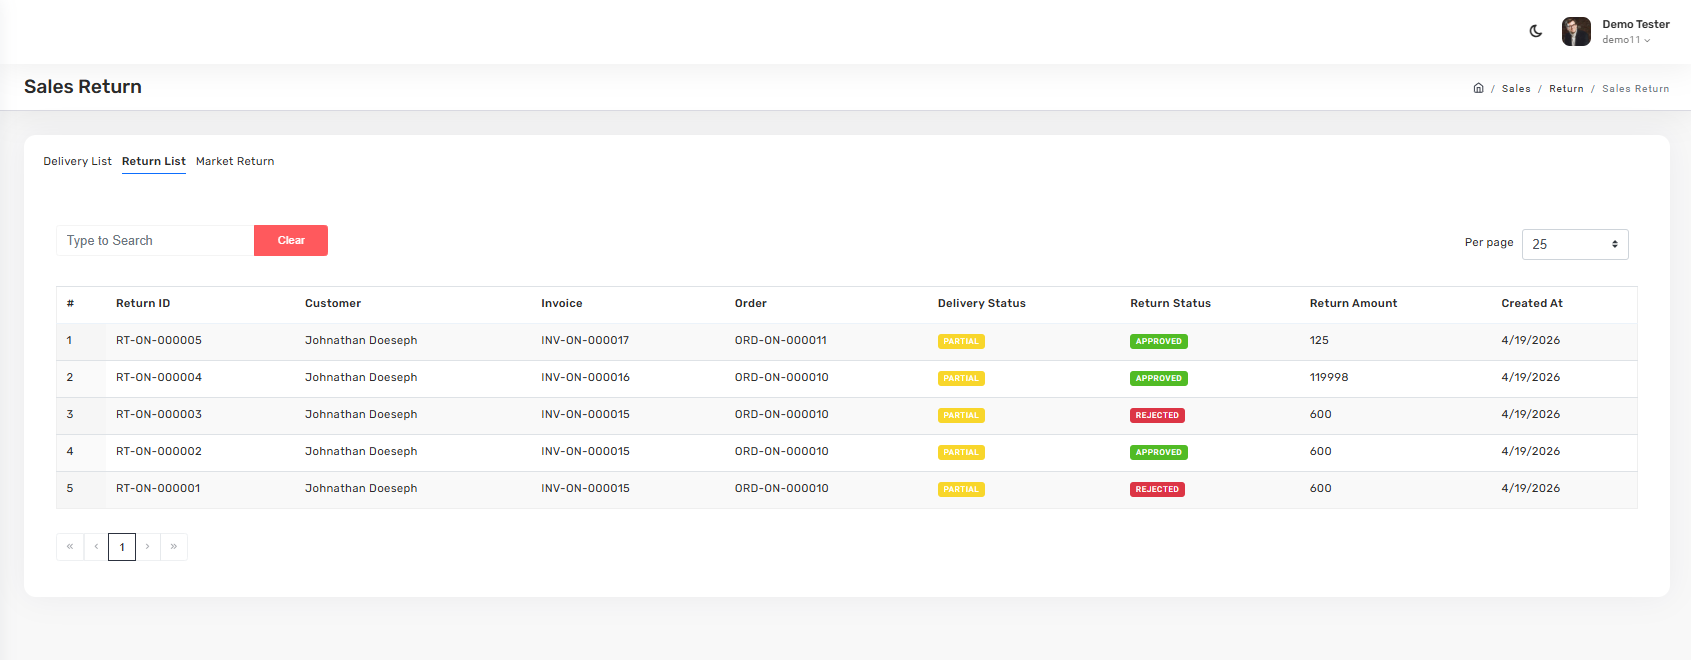
Sales Return
Manage customer returns across three tabs:
- Delivery List — challans, delivery dates, and delivered vs returned quantity.
- Return List — approved and rejected returns with amounts.
- Market Return — returns from market distribution channels.

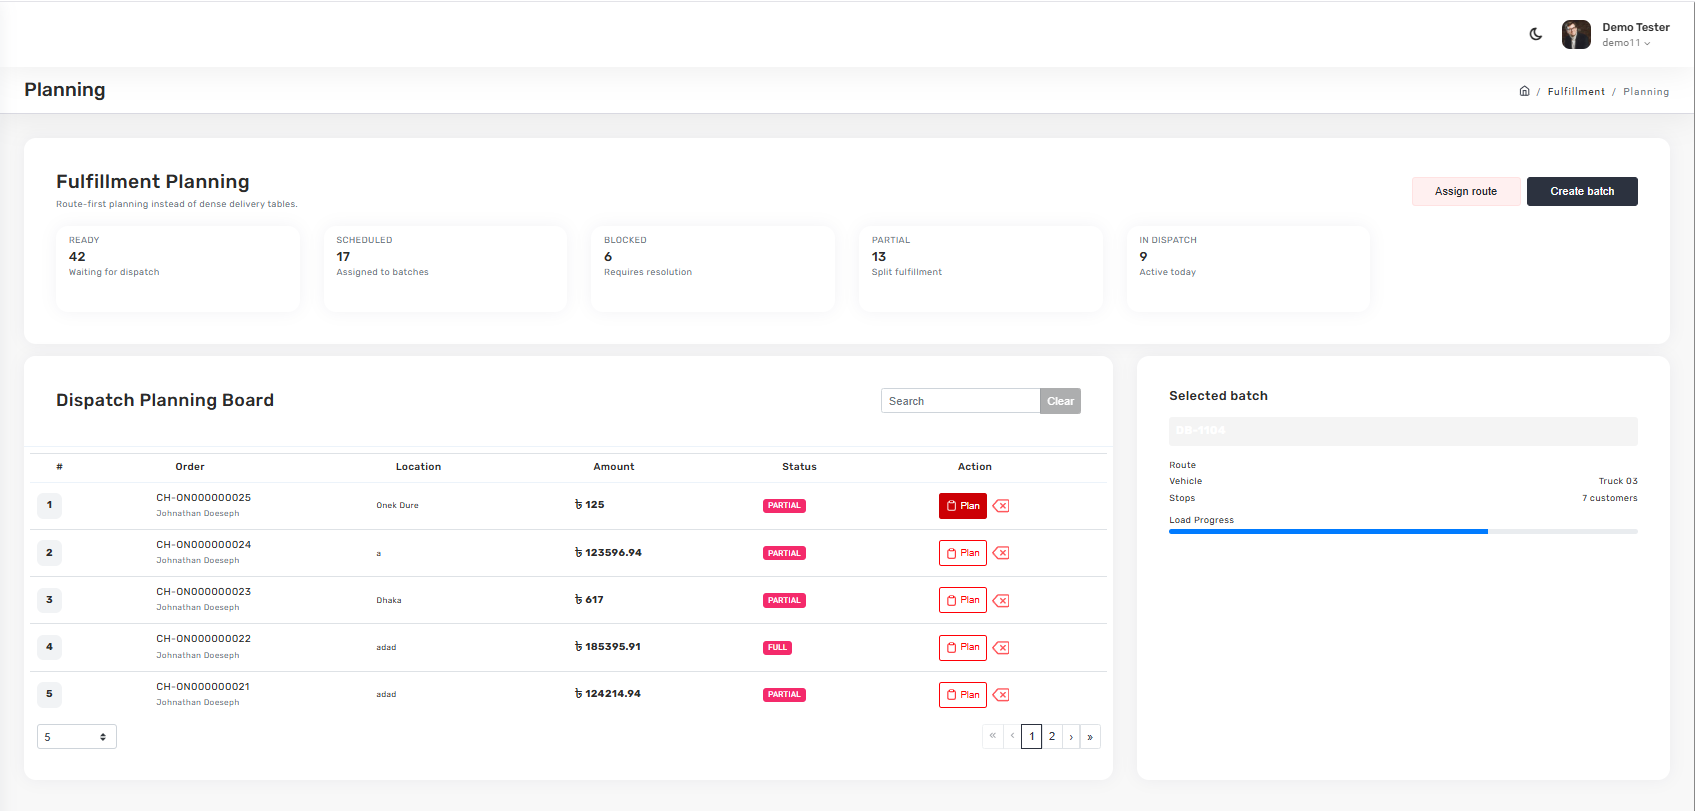
Fulfillment
The Dispatch Planning Board groups orders by location and status (Ready, Scheduled, Blocked, Partial, In Dispatch). Create batches, assign routes, and track vehicle load progress.
CRM Module
Manage the full customer pipeline — from initial lead to long-term client relationship. Three submenus for three stages of relationship depth.
flowchart LR
    classDef stage fill:#fff,stroke:#c8402c,color:#0f1115
    L[Lead
Light record]:::stage --> C[Client
Full customer record]:::stage --> CO[Company
B2B account]:::stage
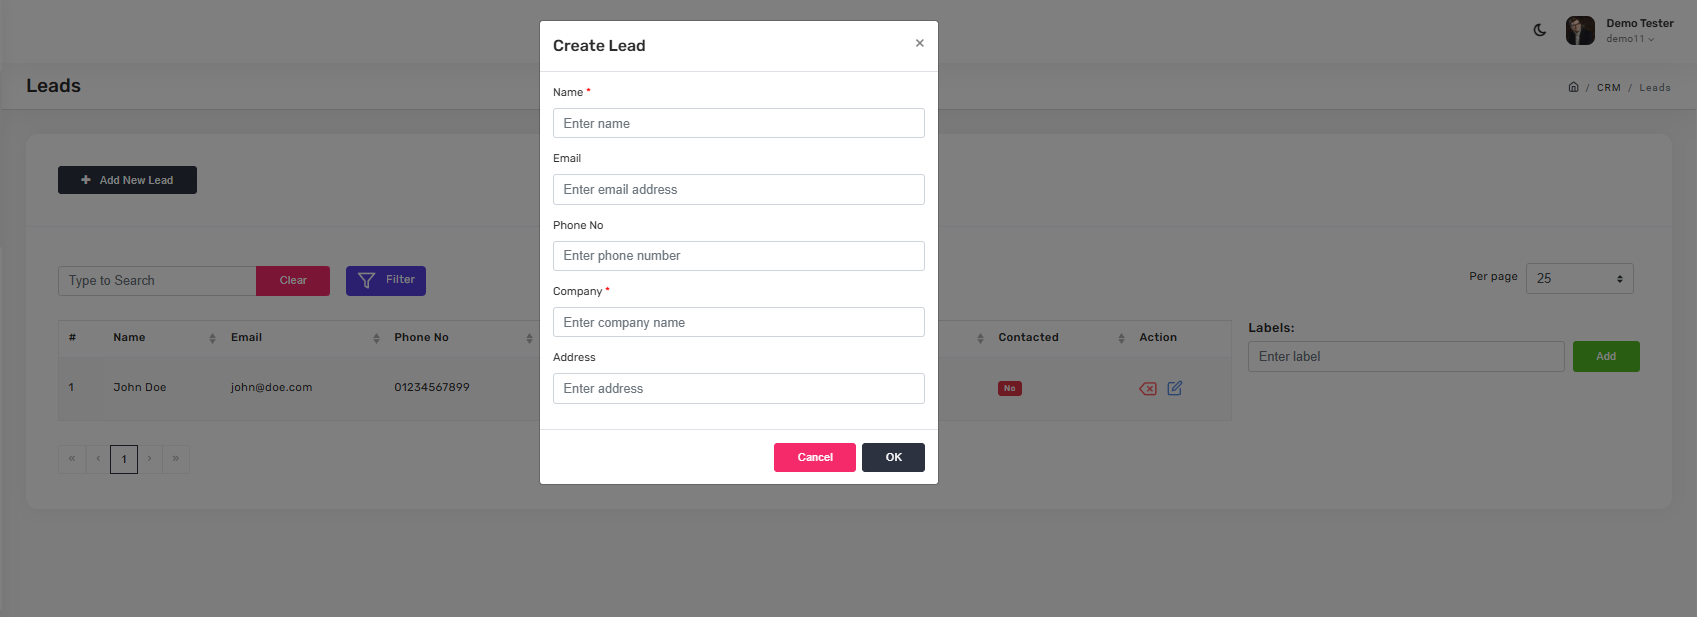
Leads
Capture potential customers with minimal friction — name, email, phone, address, and labels for pipeline tagging.
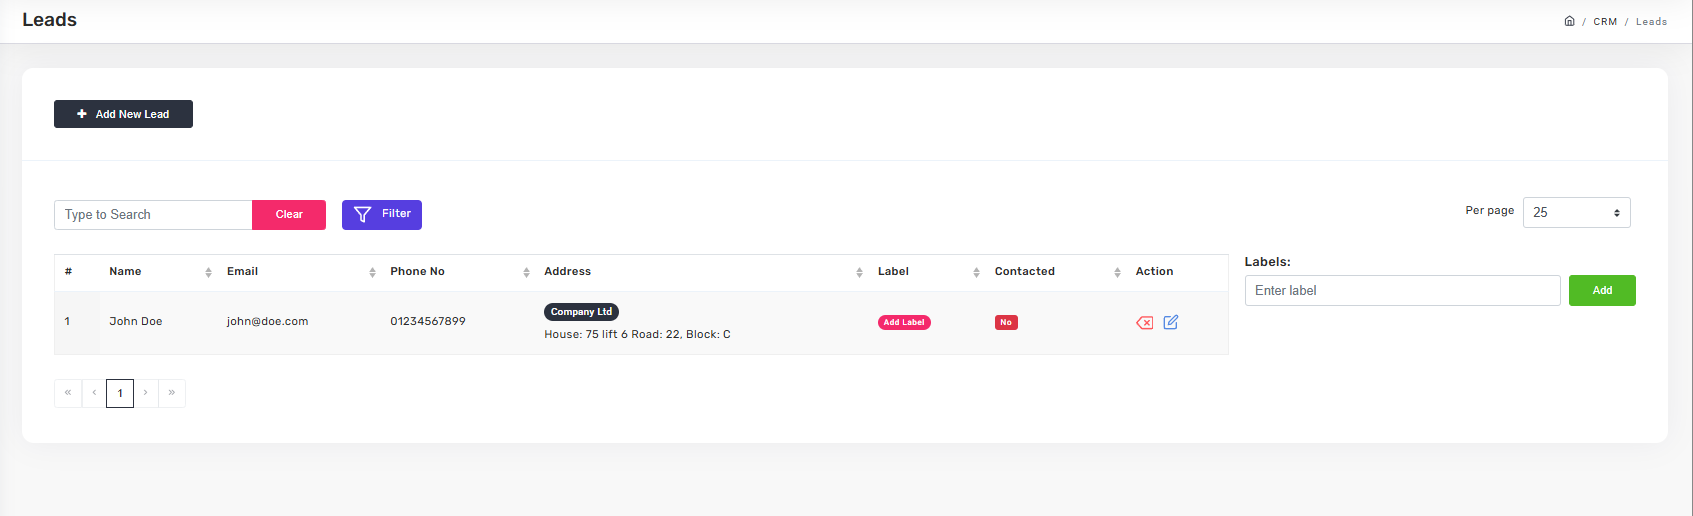
Click + Add New Lead to open the create dialog. Add labels on the right side to tag leads by source or stage.
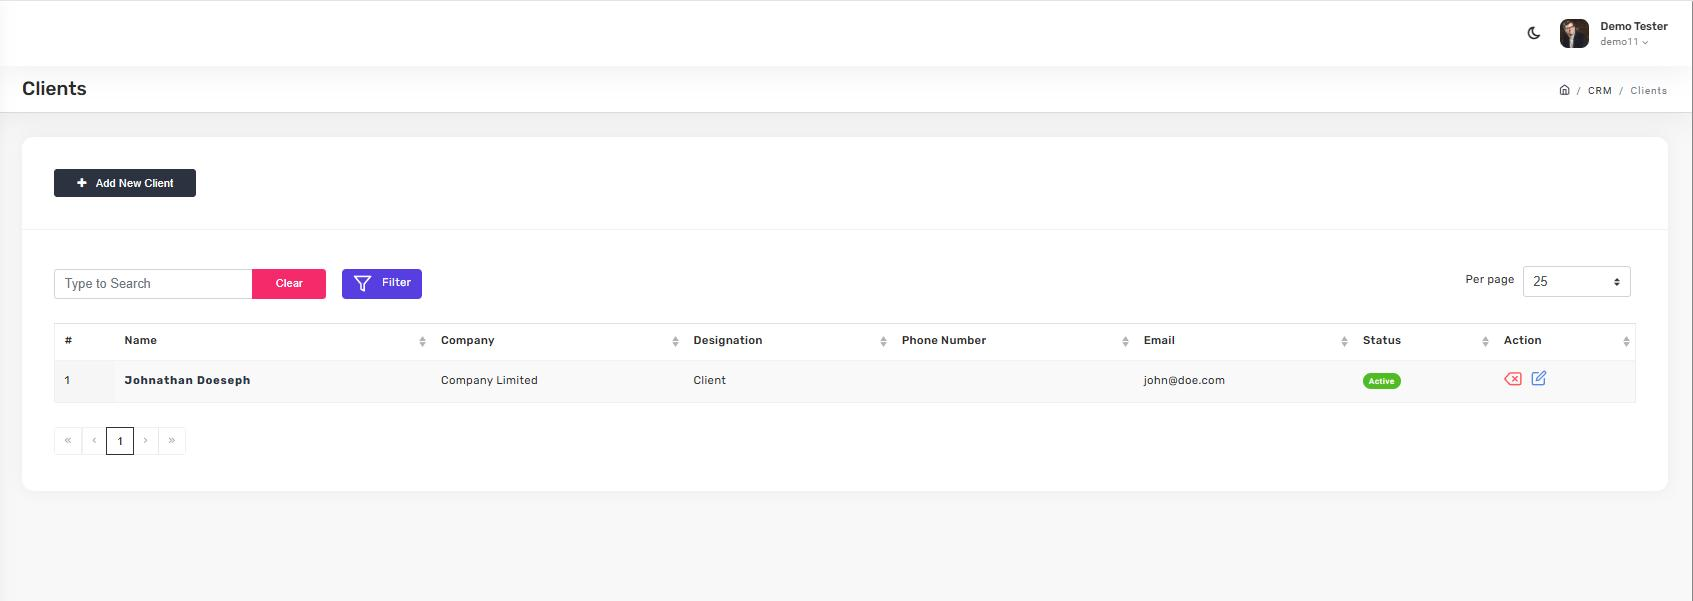
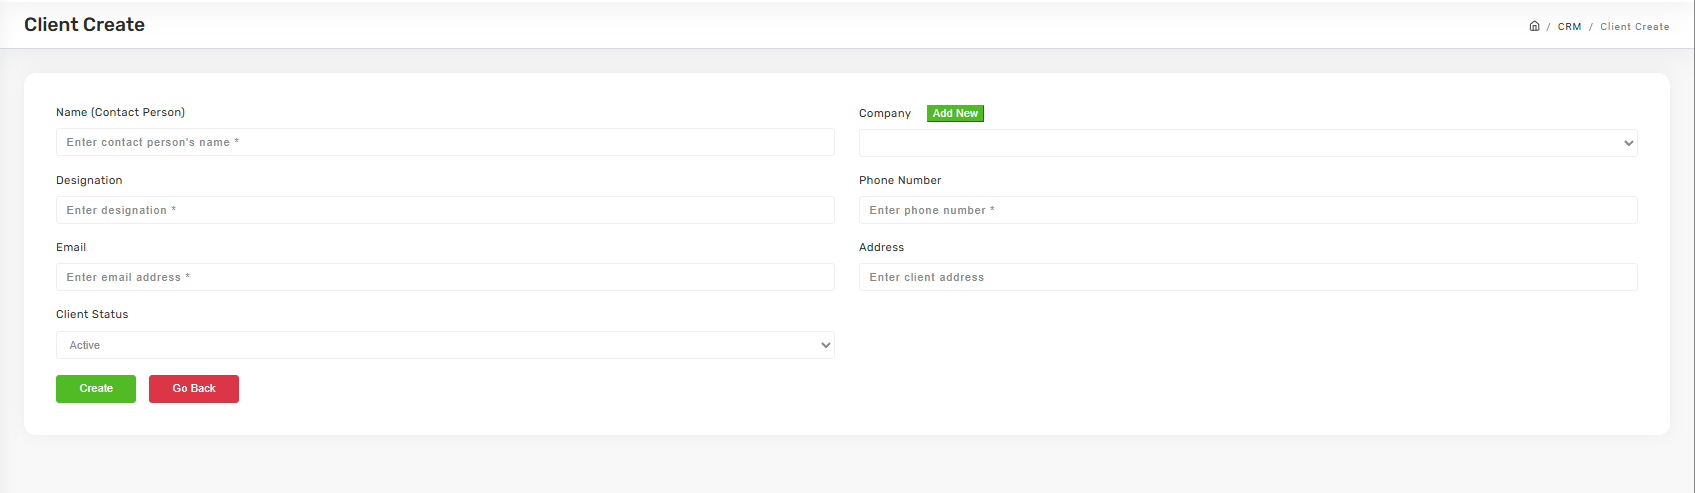
Clients
When a lead becomes a real customer, promote them to a Client. Client records carry contact person, company, designation, phone, email, and status.
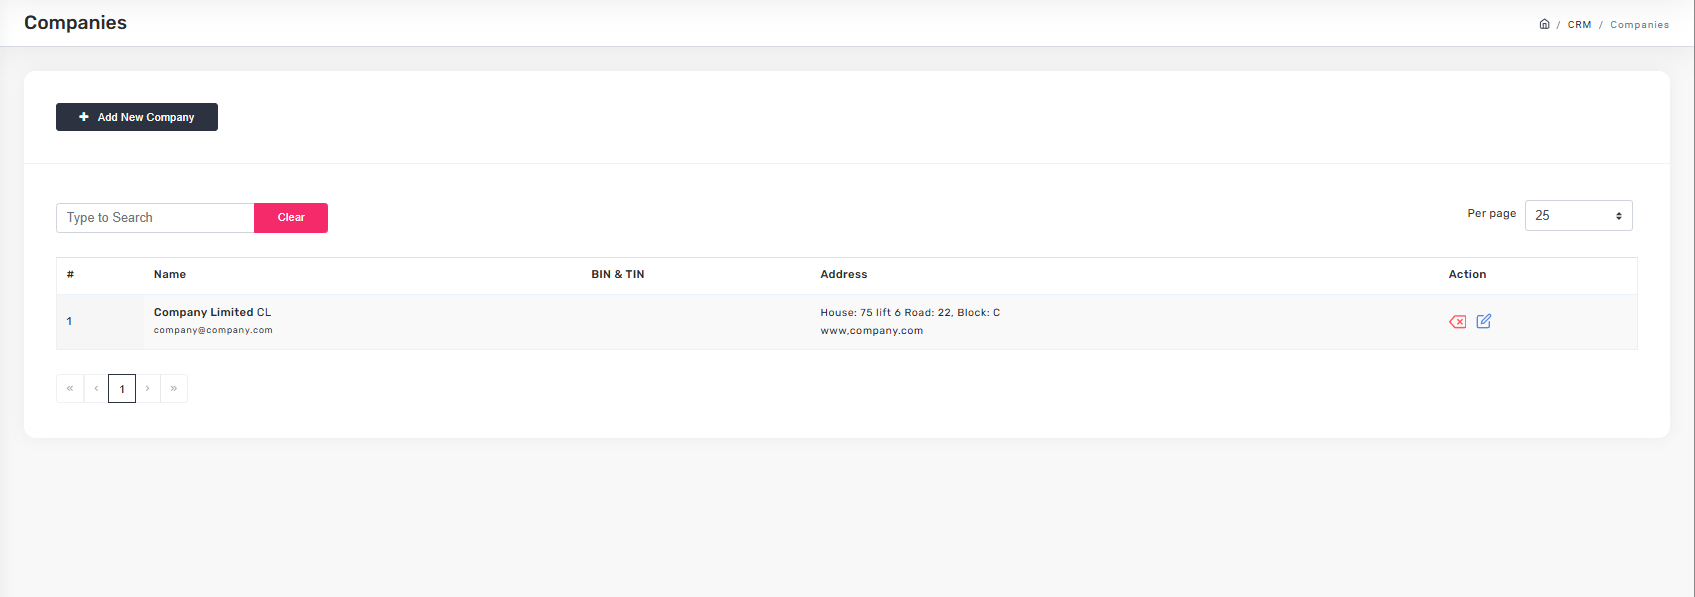
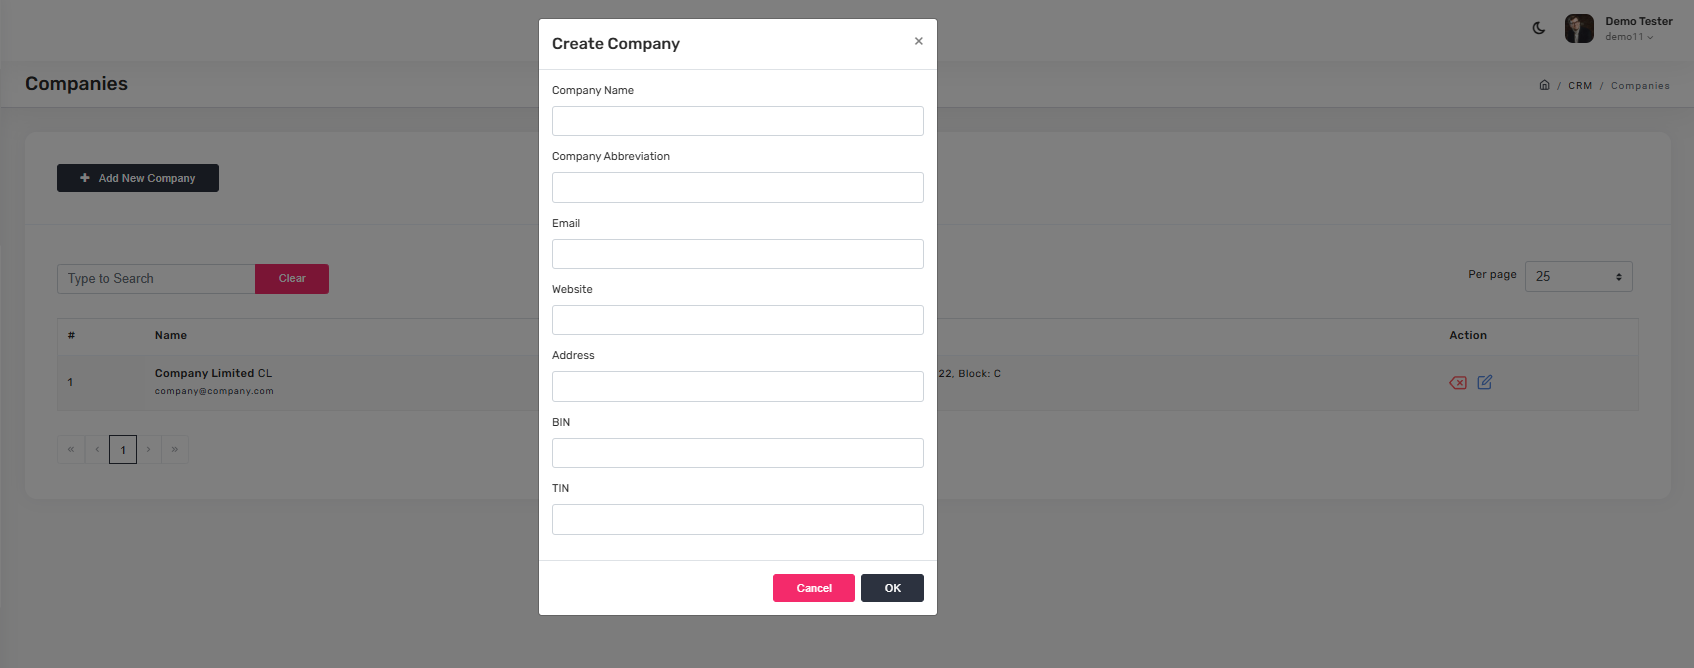
Companies
For B2B work, register the client's organization as a Company. This lets multiple Client contacts link to the same Company account.
Procurement & RFP
Manage vendors and run Request for Proposal (RFP) workflows. Three submenus: vendor contacts, the vendor list itself, and RFPs.
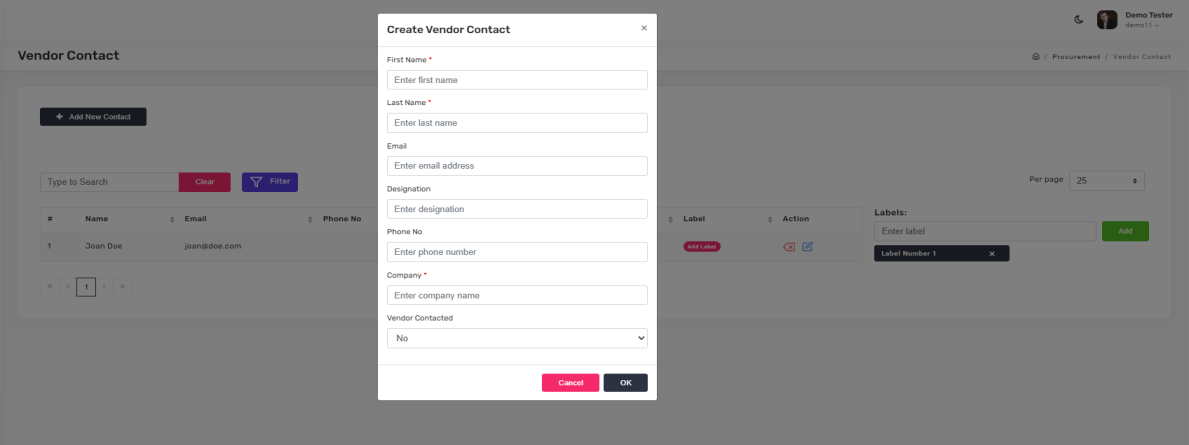
Vendor Contacts
Individual points of contact at each vendor — name, email, phone, company, labels.
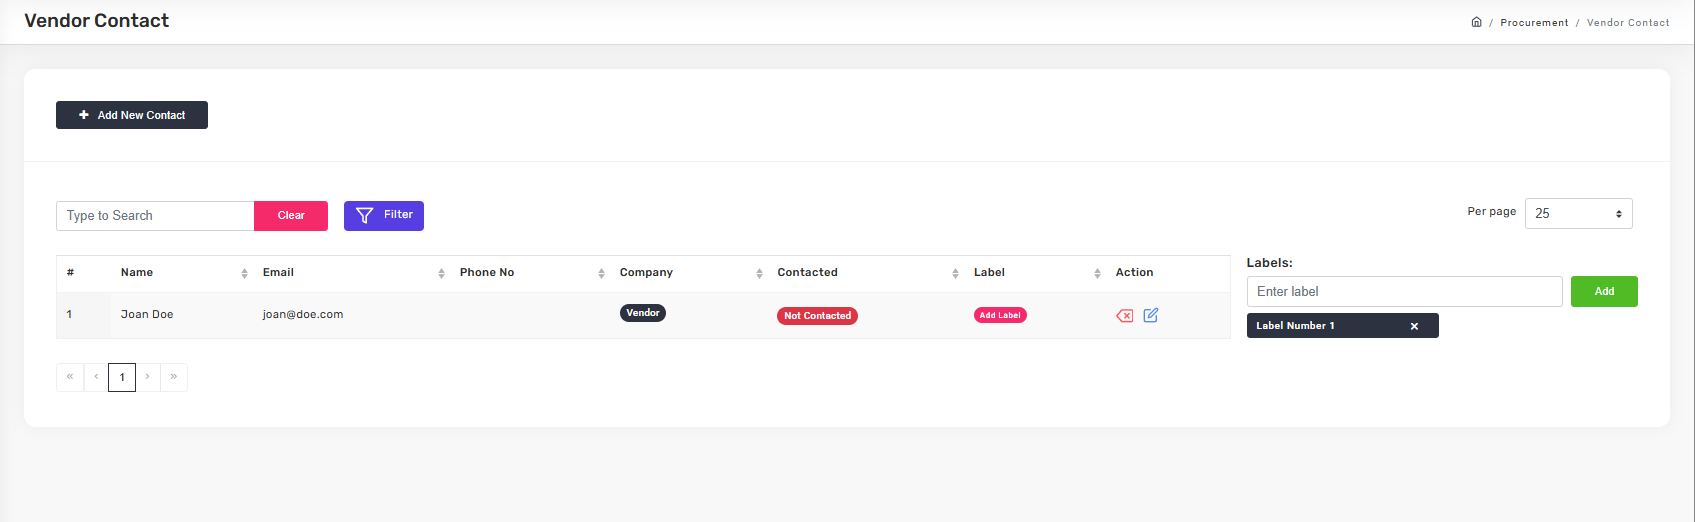
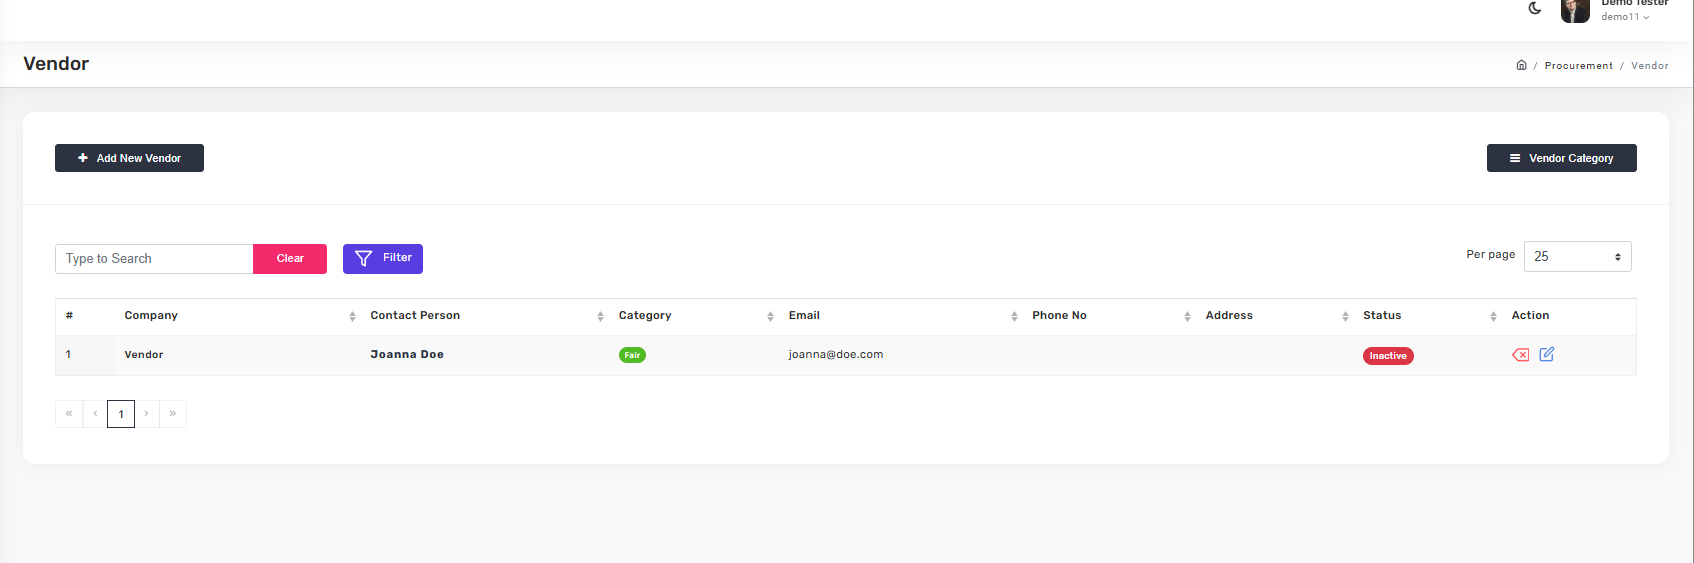
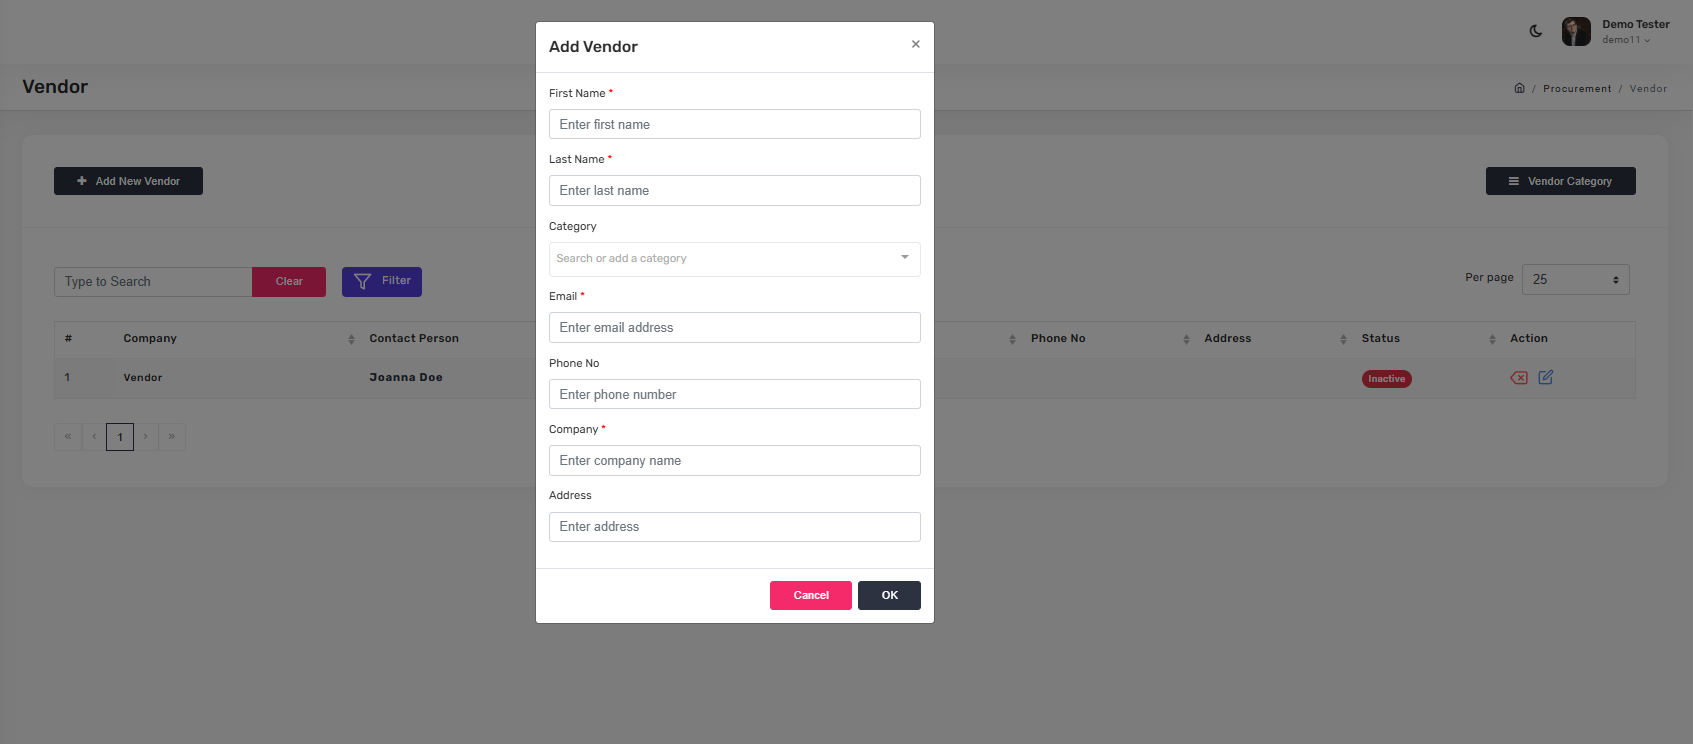
Vendor List
The master list of vendor companies — contact person, category, email, phone, address, and status (Active, Inactive).
RFP (Request for Proposal)
Create, track, and manage RFPs with category classification, project linking, vendor assignment, and deadlines.
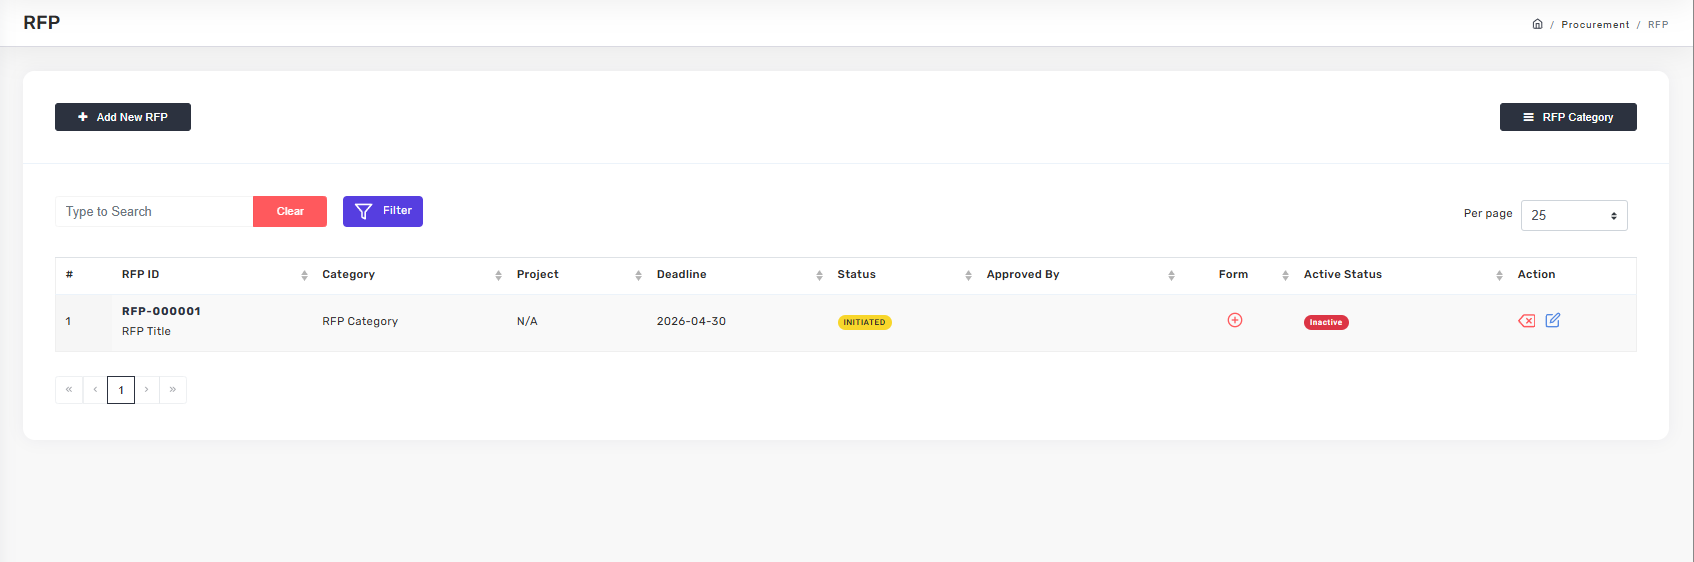
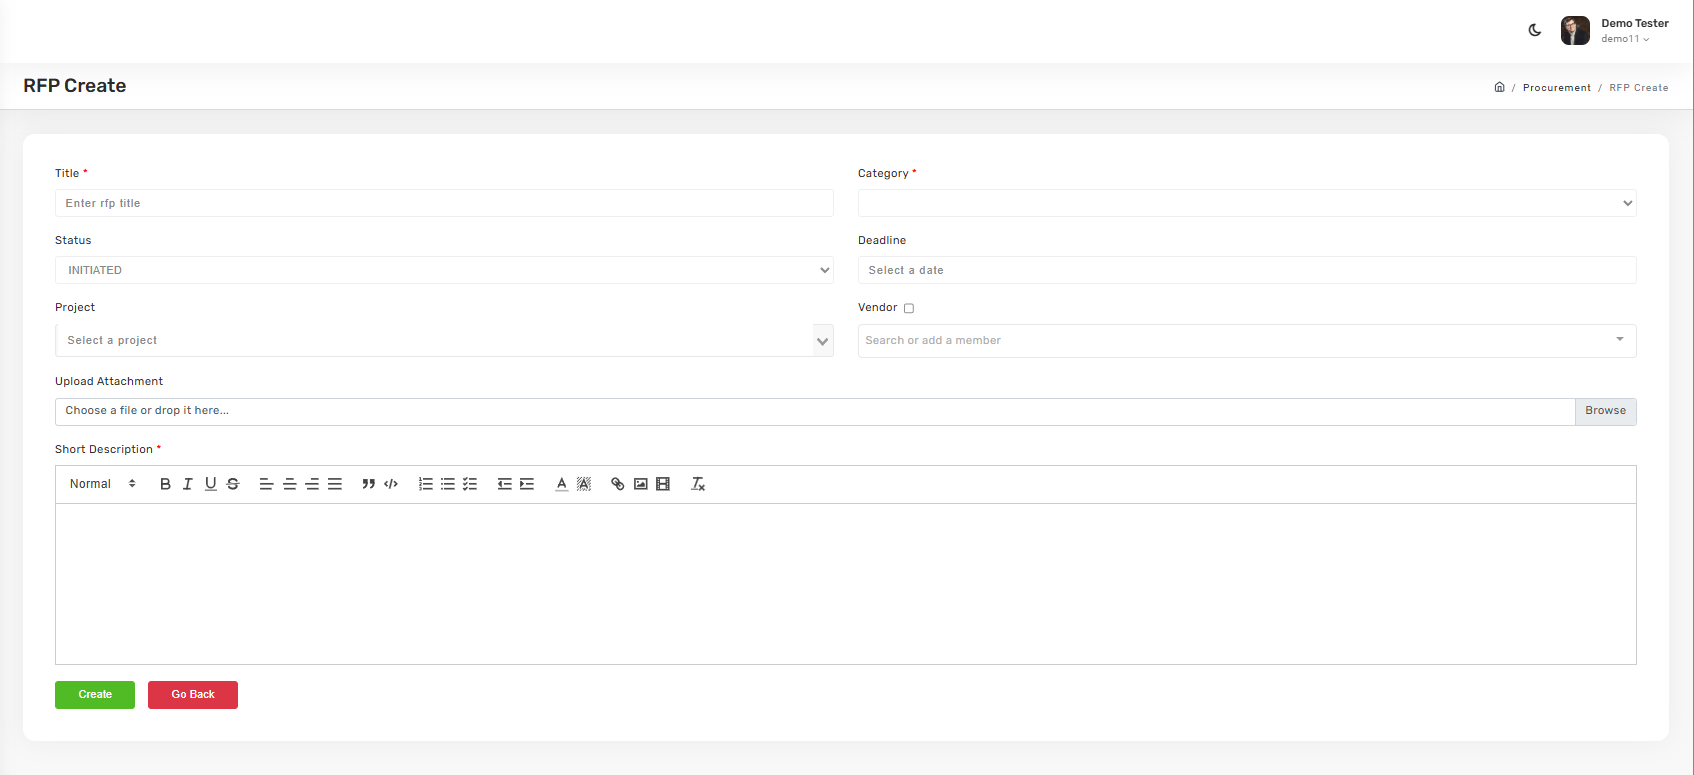
To create a new RFP, click + Add New RFP. Set the Title, Category (create categories first via RFP Category), Status (Initiated, Active, Closed), Deadline, Project, and assigned Vendor. Upload any reference attachments and write a Short Description.
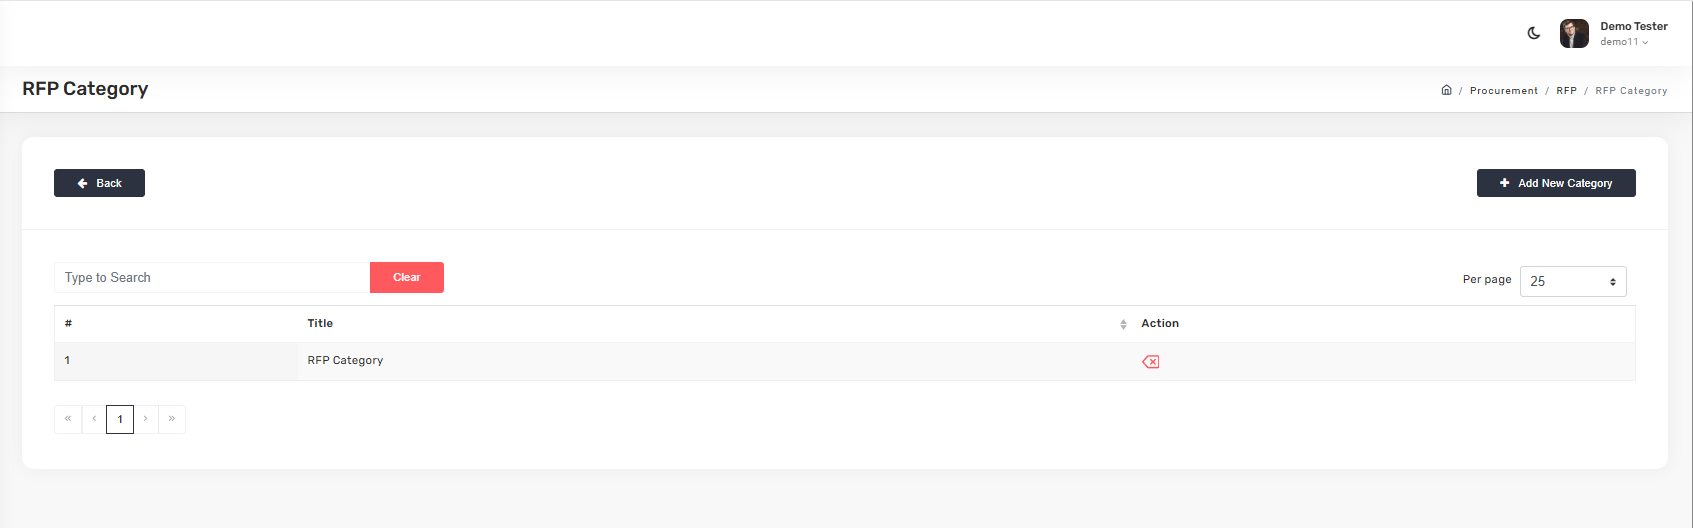
RFP Categories
Define the taxonomy of RFP types so every RFP is classified consistently.
EOD Reports (Team Oversight)
The operational view of every EOD report submitted across the organization. Two submenus: a consolidated list and a team grid.
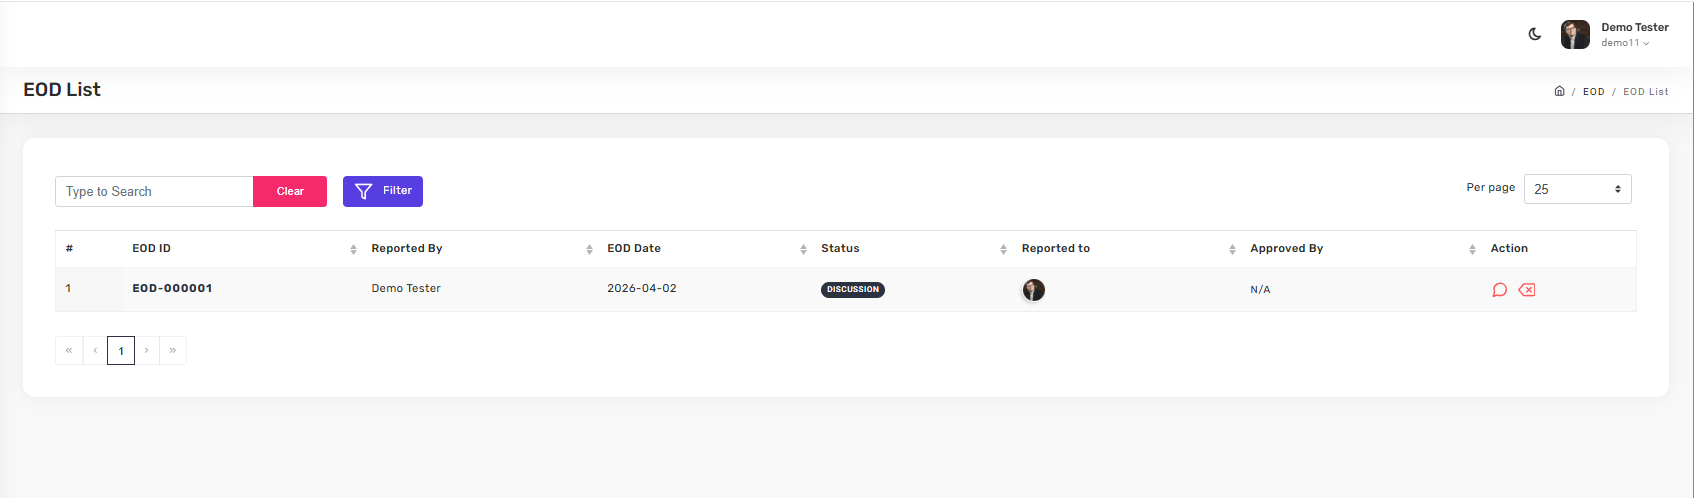
EOD List
All submitted EOD reports in one filterable table — EOD ID, reporter, date, status, who it was reported to, and approval status.
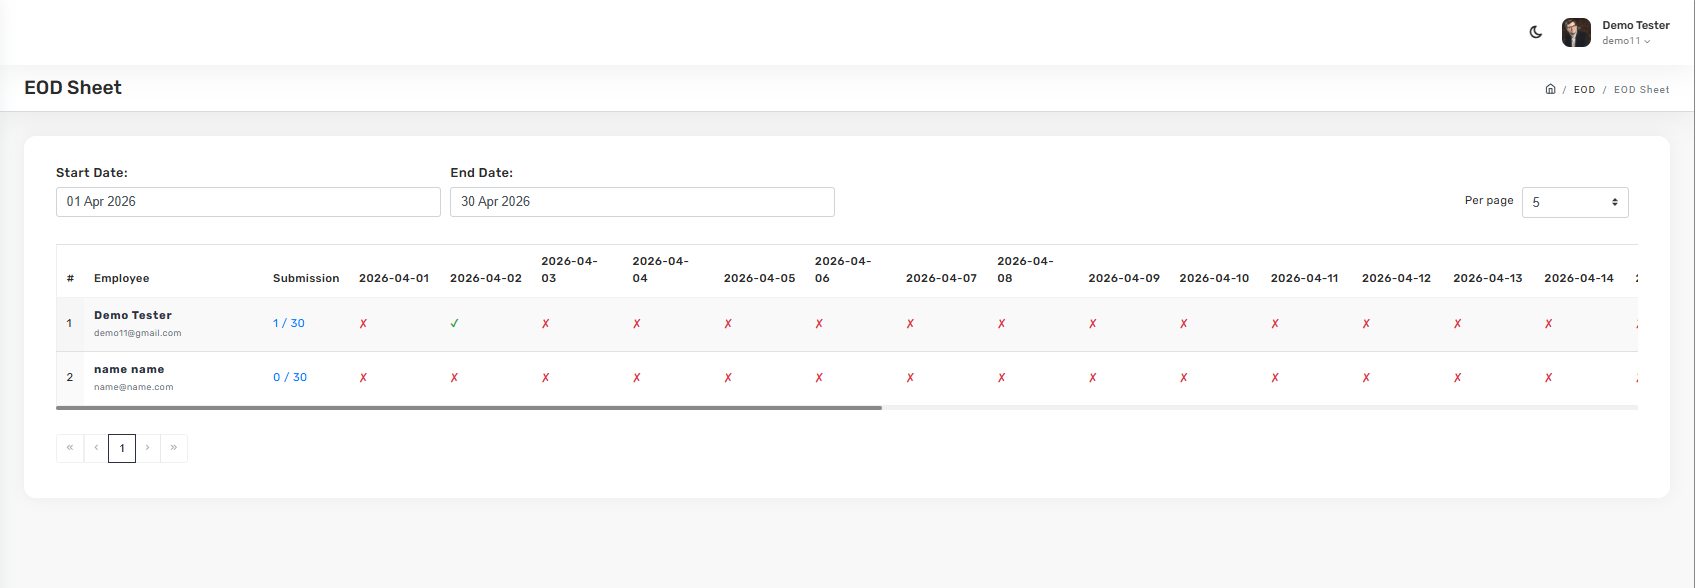
EOD Sheet
A calendar-grid view of who submitted EOD reports on which days. Each cell is a ✓ (submitted) or ✗ (missing). Use this to spot gaps fast.
HR & Admin
Configure the company and run the back office. This is where you define how the whole ERP behaves — weekends, departments, payroll, policies — and where you handle day-to-day HR operations.
Four functional groups
- Compliance & Governance — Policy, Compliance, Holidays, Activity Log
- Employee Lifecycle & Talent — Onboarding, Organization, Training, Job
- Operations & Time Tracking — Time Sheet, Attendance, Leave, Asset Management
- Financials & Support — Payroll, Requisition, Grievance, Ticket
Organization Setup
The foundation. Set up company identity, weekends, tax IDs, branding, departments, designations, and employees before configuring anything else.
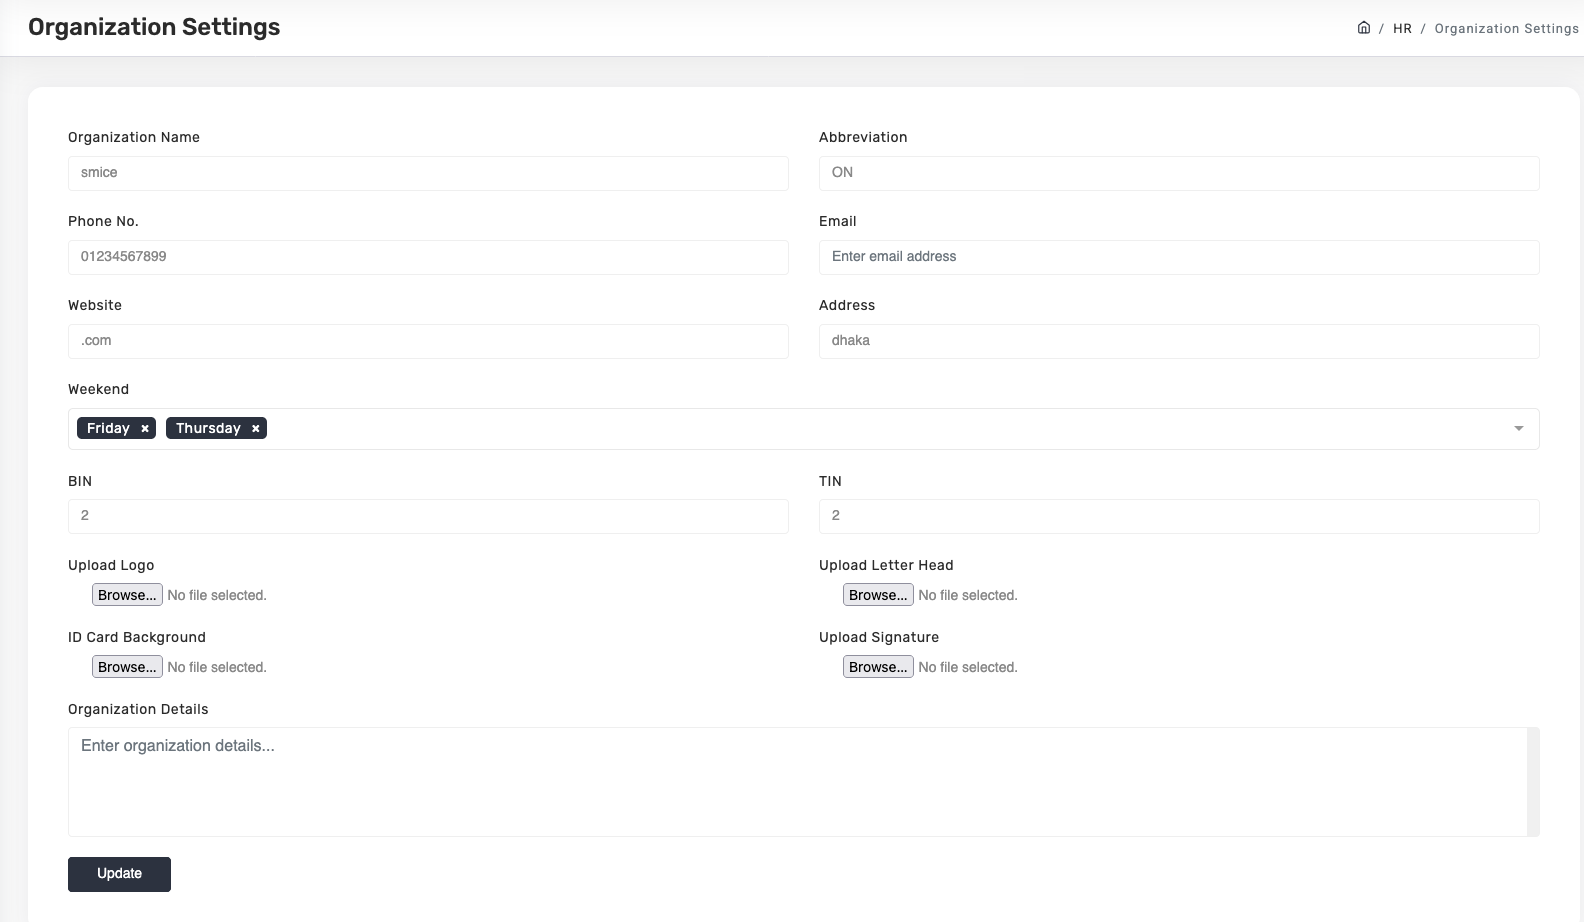
Organization Settings
Navigate to HR & Admin → Organization Settings. Fill these four sections:
1. General Information — Organization Name, Abbreviation, Phone, Email, Website, Address.
2. Operational Configuration — Weekend days (this controls every attendance and leave calculation), BIN (Business Identification Number), TIN (Taxpayer Identification Number).
3. Branding & Documentation Assets — Logo, Letterhead, ID Card Background, Signature. These appear on payslips, invoices, and ID cards.
4. Finalizing — Add company details in the text area and click Update to apply company-wide.
Departments
Go to Organization → Departments → Add New Department. Enter department name and confirm. Repeat for each department in your company (Engineering, Sales, HR, etc.).

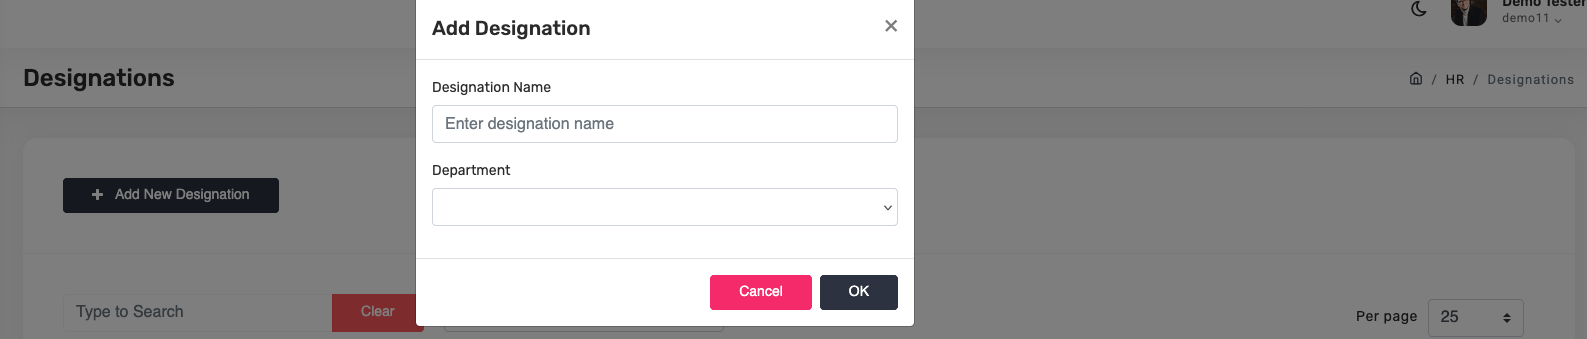
Designations
Go to Organization → Designations → Add New Designation. Enter the job title and tie it to a department.
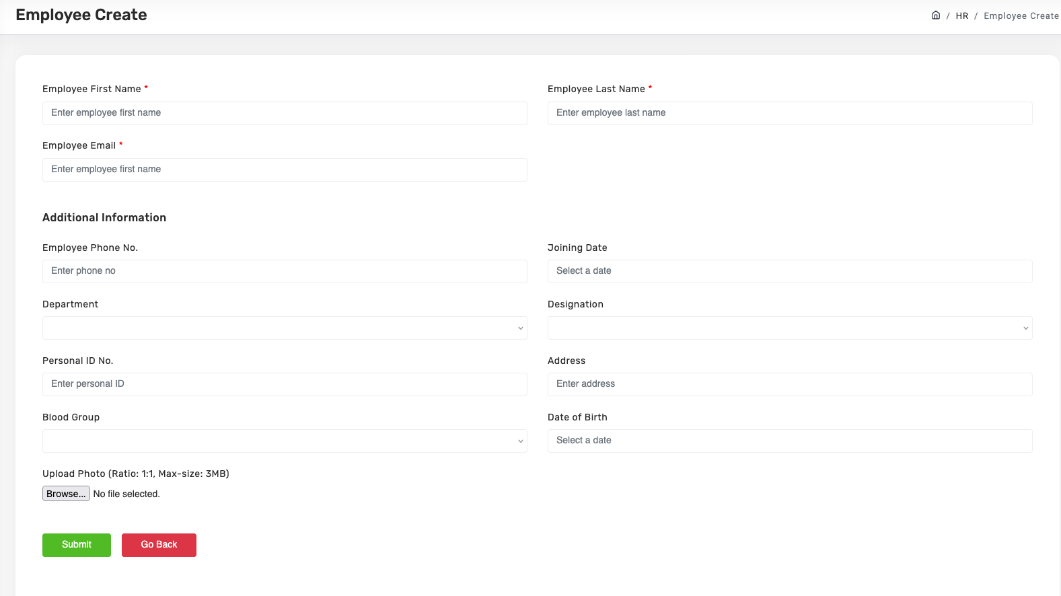
Add an Employee
Go to Organization → Employees → Add New Employee. Fill in:
- Core identity — First Name, Last Name, Email, Phone, Joining Date
- Placement — Department, Designation
- Personal — Personal ID No, Address, Blood Group, Date of Birth, Photo (1:1, max 2MB)
Policy & Compliance
Centralize company rules (Policy) and legal requirements (Compliance). Both are managed the same way but serve different purposes.
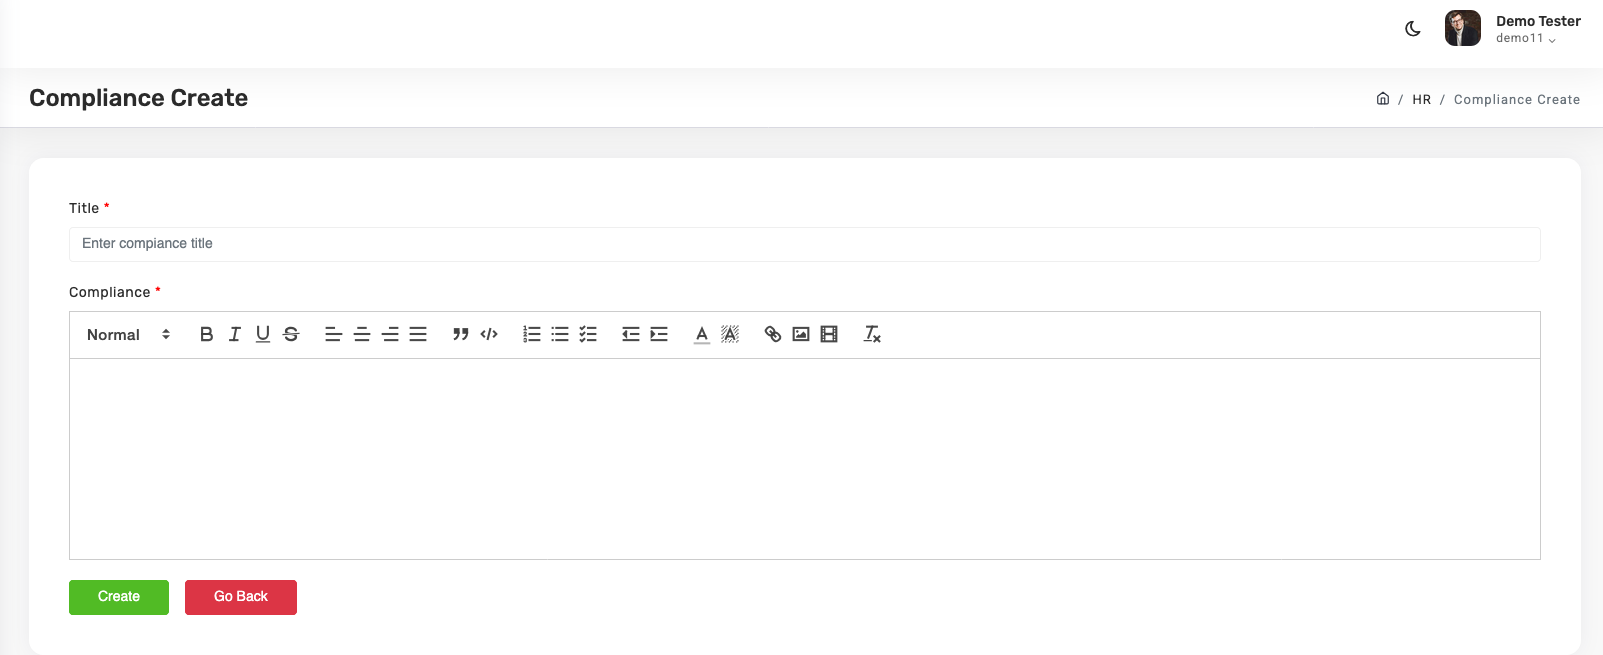
Add a Policy
- Click
HR & Admin → Policy. - Click + Add New Policy.
- Enter the Policy Title.
- Write the policy text in the rich-text editor.
- Click Submit.
Add a Compliance document
The workflow is identical to Policy — HR & Admin → Compliance → + Add New Compliance, enter title and content, Submit.
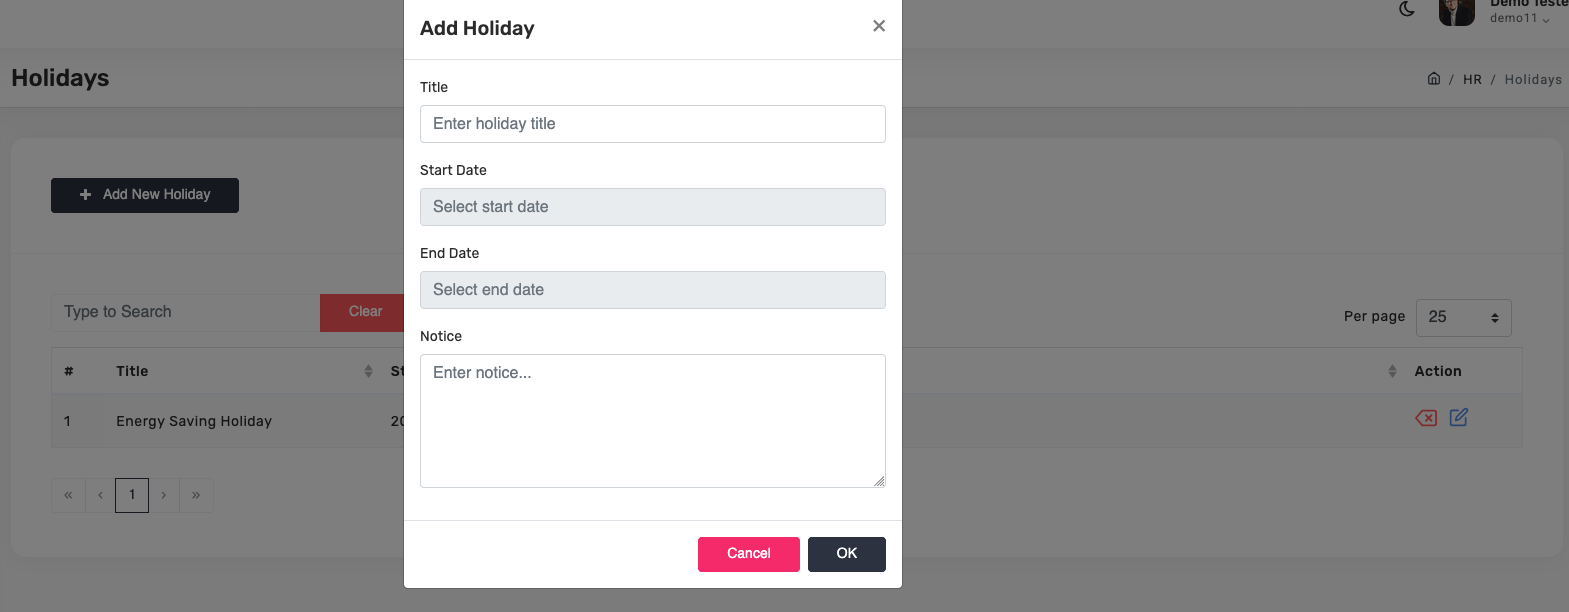
Holidays
Go to HR & Admin → Holidays → Add New Holiday. Enter Title, Start Date, End Date, and Notice. The system automatically excludes these dates from attendance and leave calculations.
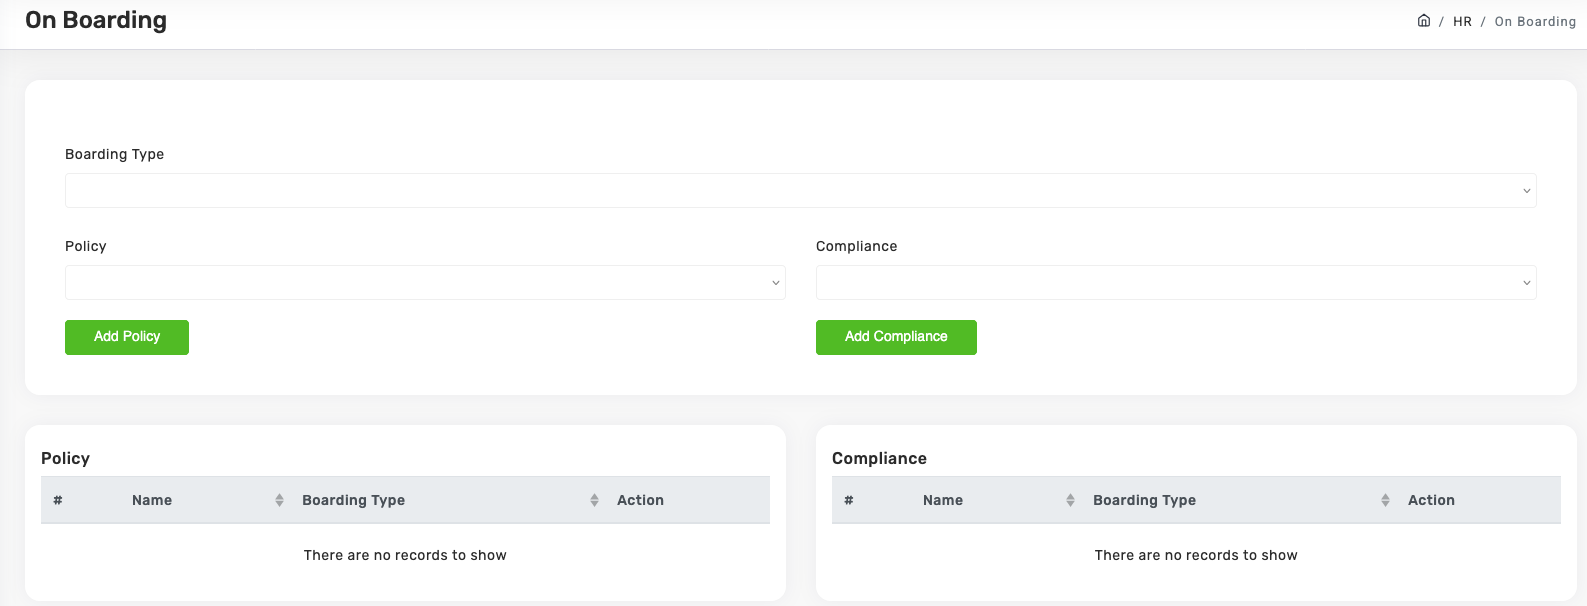
Onboarding Setup
Bundle Policy and Compliance documents under a Boarding Type (Full-Time, Contractor, Intern). When you hire someone of that type, they automatically receive the correct paperwork.
Set up a boarding type
- Navigate to
HR & Admin → On Boarding. - Select or create a Boarding Type (e.g., Full-Time Employee, Contractor, Intern).
- From the Policy dropdown, pick a policy and click Add Policy. Repeat for each policy.
- From the Compliance dropdown, pick an item and click Add Compliance. Repeat for each.
- Both tables below show what's been attached.
Payroll
Payroll is built in three layers, in strict order. You cannot skip steps.
flowchart TD
    classDef step fill:#fff,stroke:#c8402c,color:#0f1115
    A[Layer 1: Payroll Items
Define each salary line]:::step --> B[Layer 2: Designation Payroll
Map items to job titles]:::step --> C[Layer 3: Per-Employee Payroll
Assign to individuals]:::step
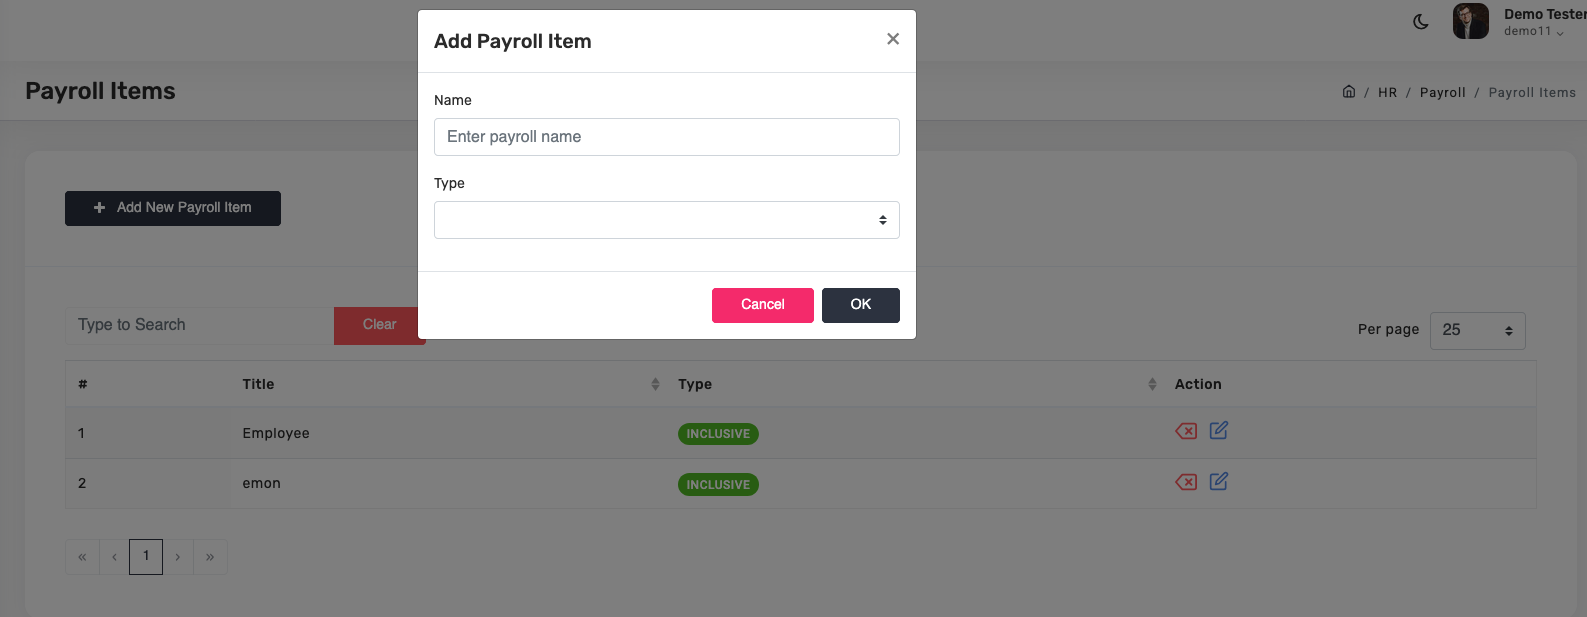
Layer 1 — Payroll Items
Define each line that appears on a payslip (Basic Salary, House Rent, Tax Deduction, etc.). Mark each as an Inclusion (+) or Deduction (−).
- Go to
Payroll → Payroll Items. - Click + Add New Payroll Item.
- Enter the item Name and Type.
- Click OK.
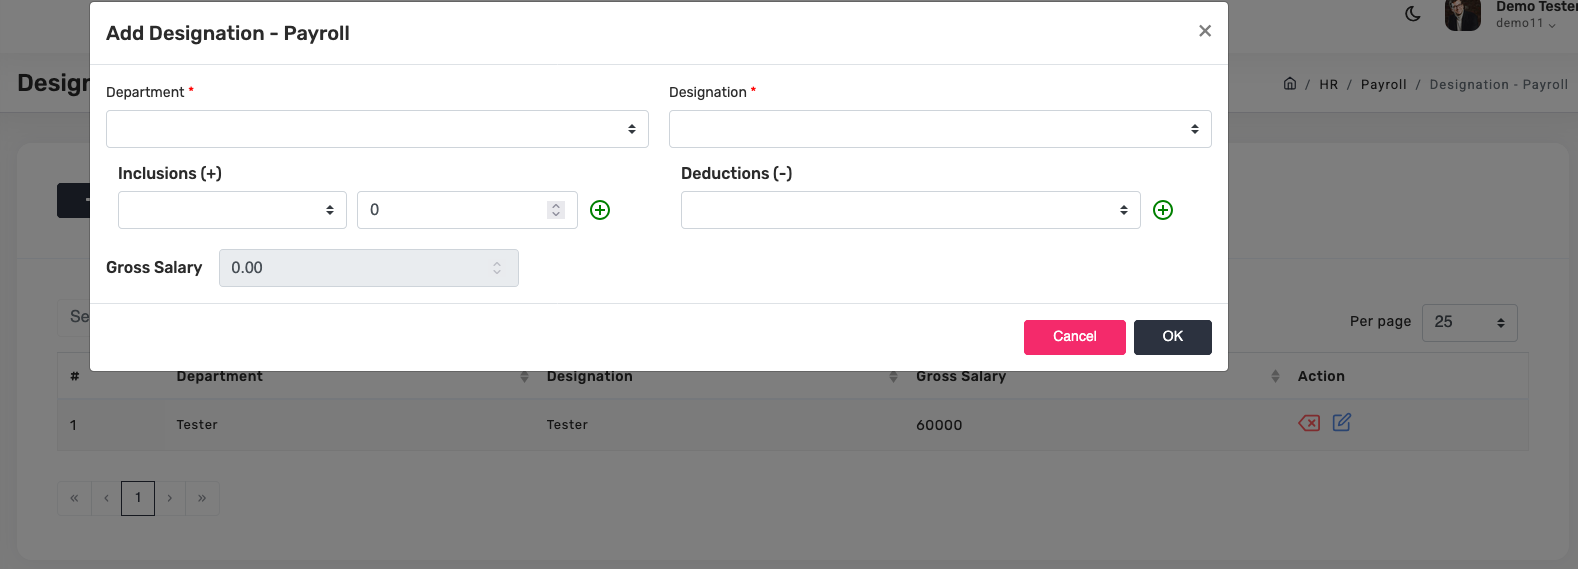
Layer 2 — Designation Payroll
For each designation, configure which payroll items apply and the gross salary.
- Go to
Payroll → Designation - Payroll. - Click + Add New Designation - Payroll.
- Pick Department and Designation.
- Add Inclusions and Deductions with amounts.
- Gross Salary calculates automatically. Click OK.
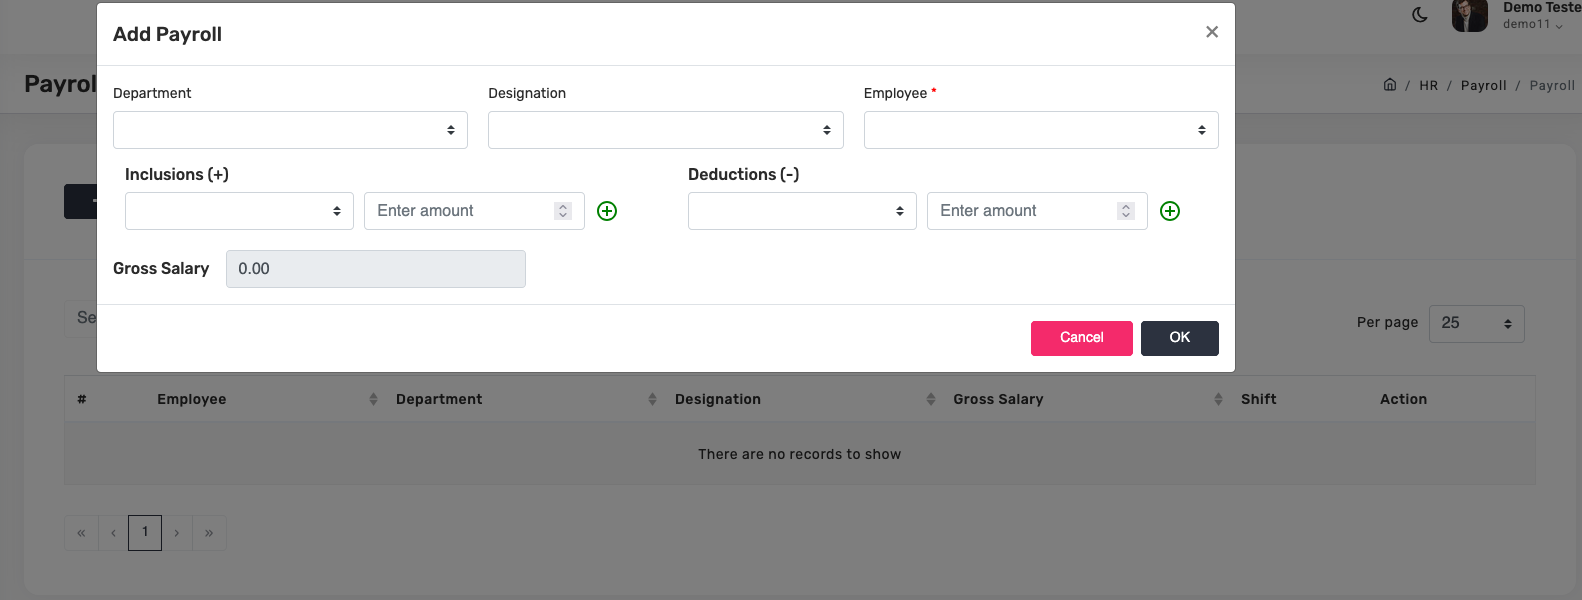
Layer 3 — Per-Employee Payroll
Assign the finalized structure to individual employees, with adjustments if needed.
- Go to
Payroll → Payroll. - Click + Add New Payroll.
- Pick Department, Designation, and Employee.
- Review inclusions and deductions (prefilled from designation).
- Click OK.
Time Sheet & Attendance
Two views of workforce presence. Time Sheet is a real-time snapshot; Attendance is the historical grid that feeds payroll.
Time Sheet — real-time
Navigate to HR & Admin → Time Sheet. Search by employee name or ID, filter by Department or Designation, adjust page size (25/50/100).
The critical column is Status:
- ABSENT (red) — Employee has not clocked in.
- PRESENT (green) — Currently logged in.
- ON LEAVE (yellow) — Approved absence, does not count against salary.
Attendance — monthly grid
Navigate to HR & Admin → Attendance. This calendar-style view drives payroll calculations.
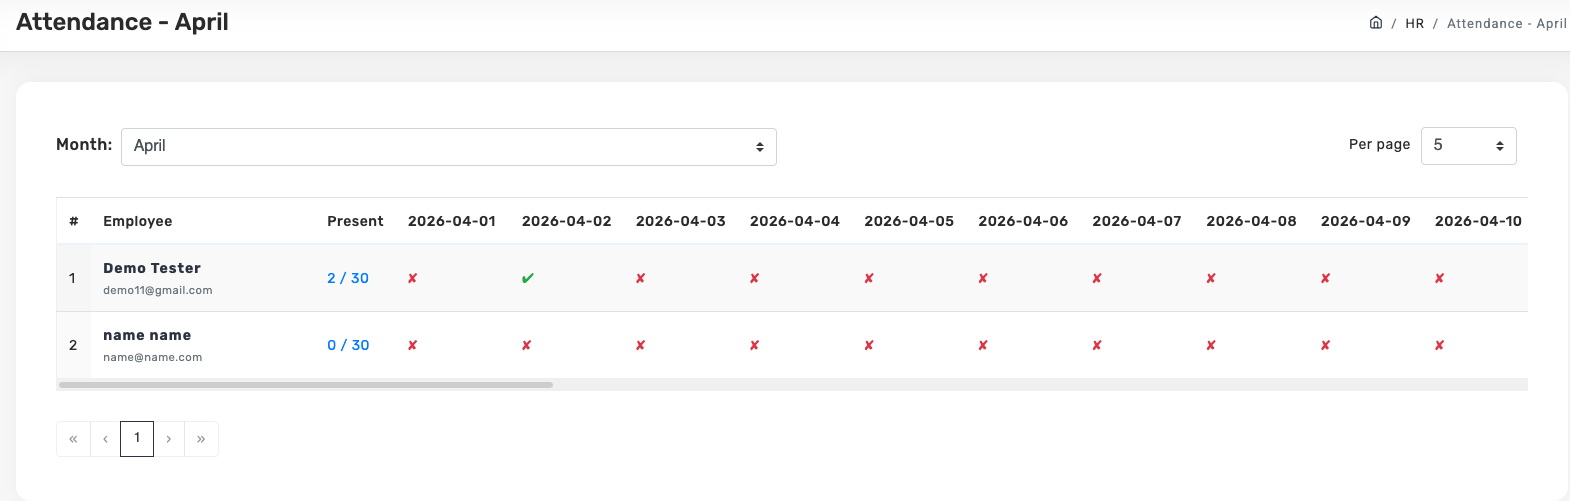
Each employee row shows a Present Ratio (e.g., 2/30) — cumulative present days over total days in the month. Each date column shows:
- ✓ green — Present / clocked in
- ✗ red — Unexcused absence or missed clock-in
- L yellow — Approved leave (does not count as absent)
Before running payroll. Scan this grid for red crosses. Verify weekends are excluded (per your Organization Settings). Confirm approved leave shows as L, not ✗. Once verified, payroll calculations will pull accurate numbers.
Leave Management
Define leave types, process employee leave requests, and track balances.
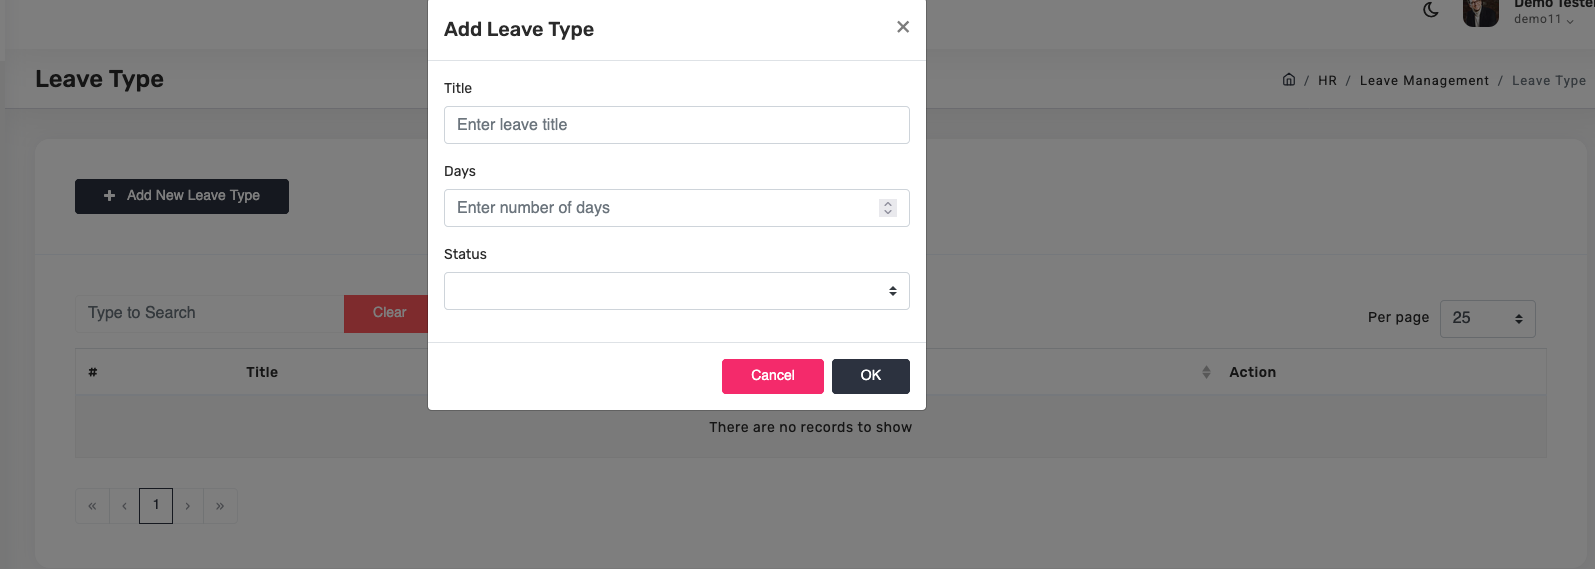
Define leave types first
- Go to
Leave Management → Leave Type → Add New Leave Type. - Enter Title (e.g., Casual Leave, Sick Leave, Annual Leave).
- Enter number of Days allowed.
- Set Status (Active / Inactive).
- Click OK.
Process a leave request
Employee requests arrive in Leave Management → Leave Requests. Review and approve or reject. Approved requests update the Attendance grid automatically — days show as L, not ✗, and don't count as absences.
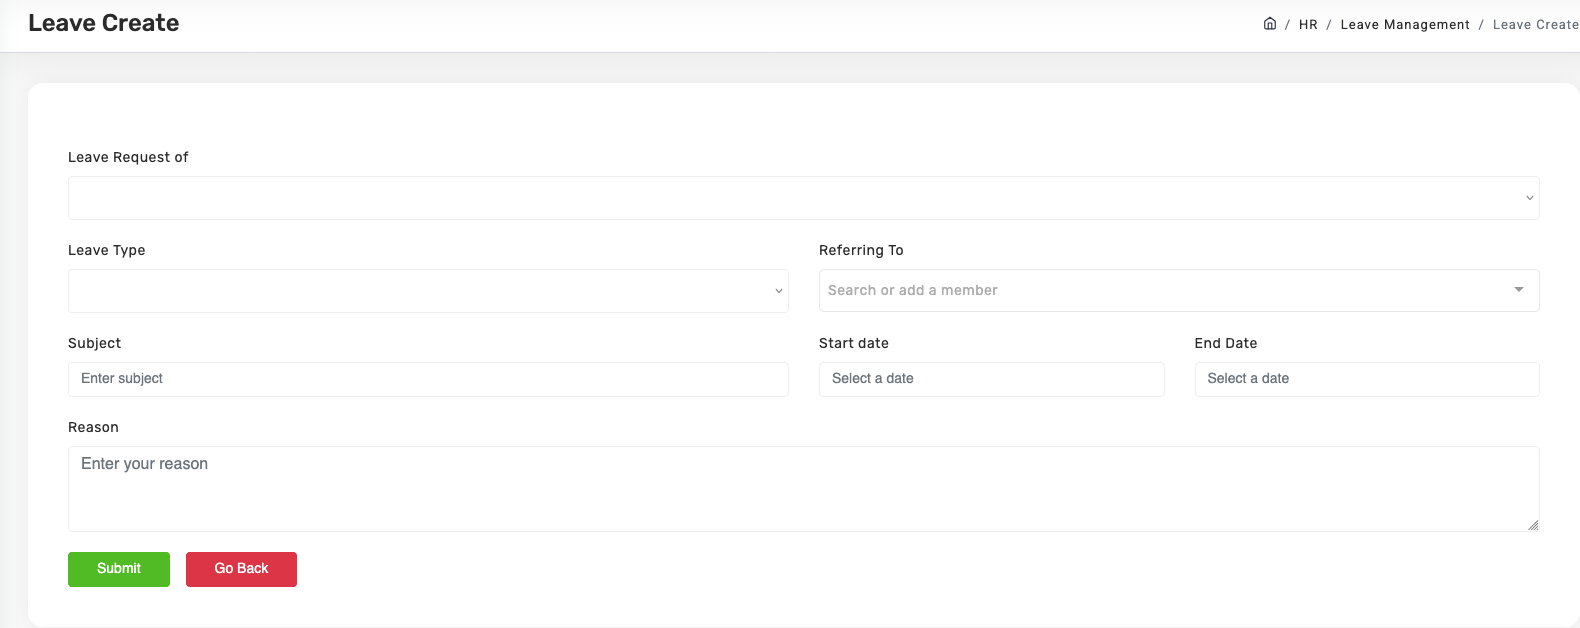
Key fields on a leave request: Leave Request of (employee), Leave Type, Referring To (approver), Subject, Duration (Start / End Date — system excludes weekends automatically), Reason.
Asset Management
Log and track every company asset — hardware, furniture, vehicles — from purchase to retirement. Critical dates like warranty expiry are tracked automatically.
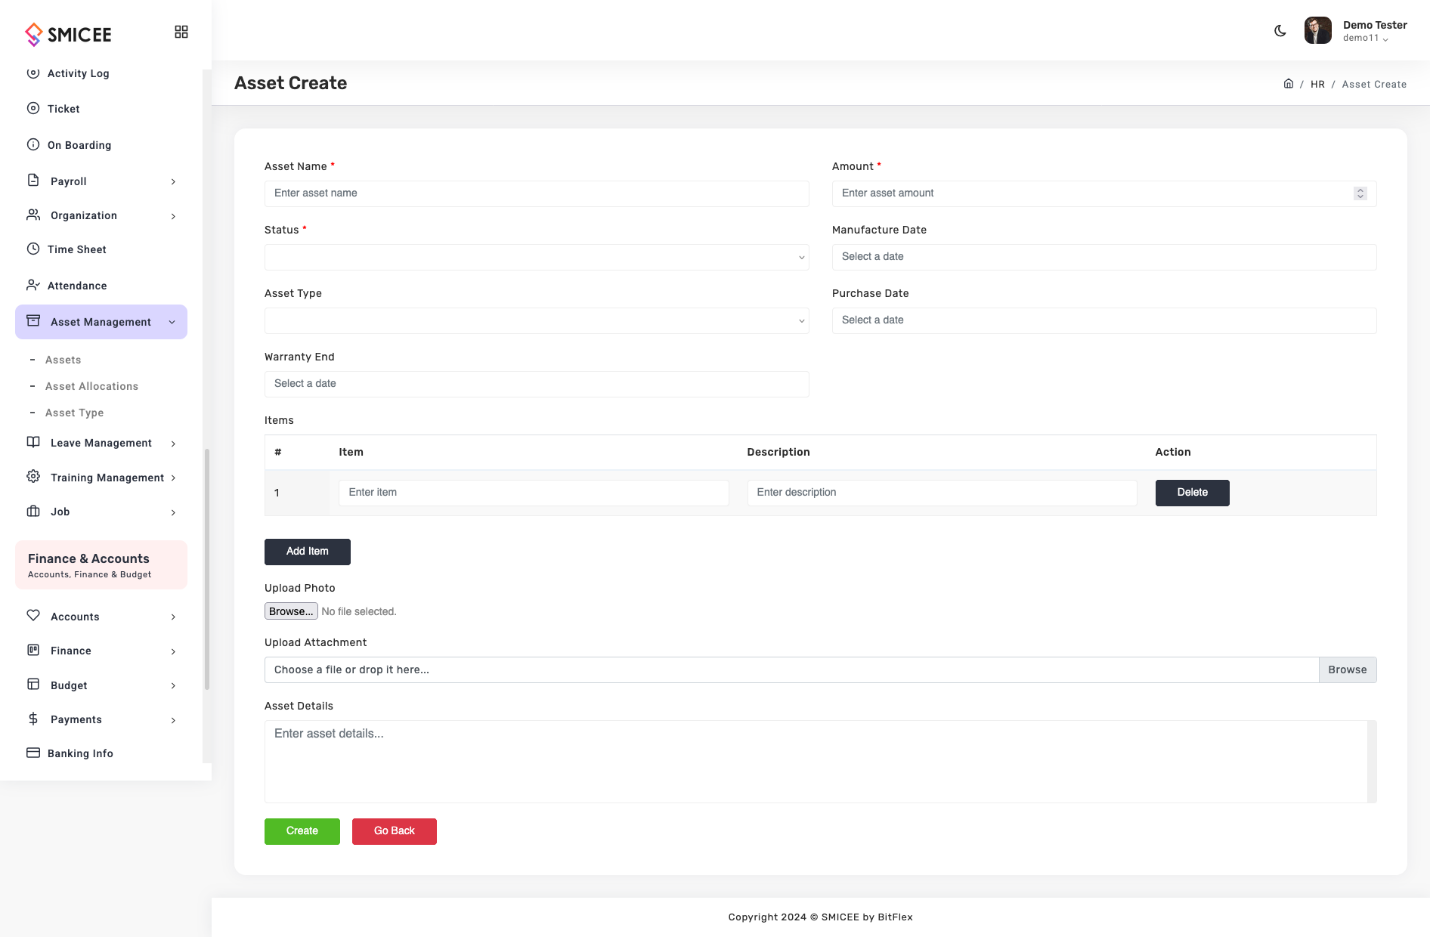
Create a new asset
- Navigate to
HR & Admin → Asset Management → Assets → Create. - Fill Asset Name (required, e.g., "MacBook Pro M2 - 2024"), Amount (required, used for balance sheet), Asset Type (Electronics, Furniture, Vehicle), Status.
- Enter critical dates: Manufacture Date, Purchase Date, Warranty End.
- If the asset has multiple parts, use the Items table with Add Item rows.
- Upload a clear photo and any documents (invoice, warranty card, manual).
- Add Asset Details — serial numbers, MAC addresses, storage location.
- Click Create.
Asset status lifecycle
- Available — Ready to be assigned.
- Allocated — Currently in use by an employee (visible in their
My Assets). - Under Maintenance — Sent for repairs.
- Damaged / Scrapped — No longer in use.
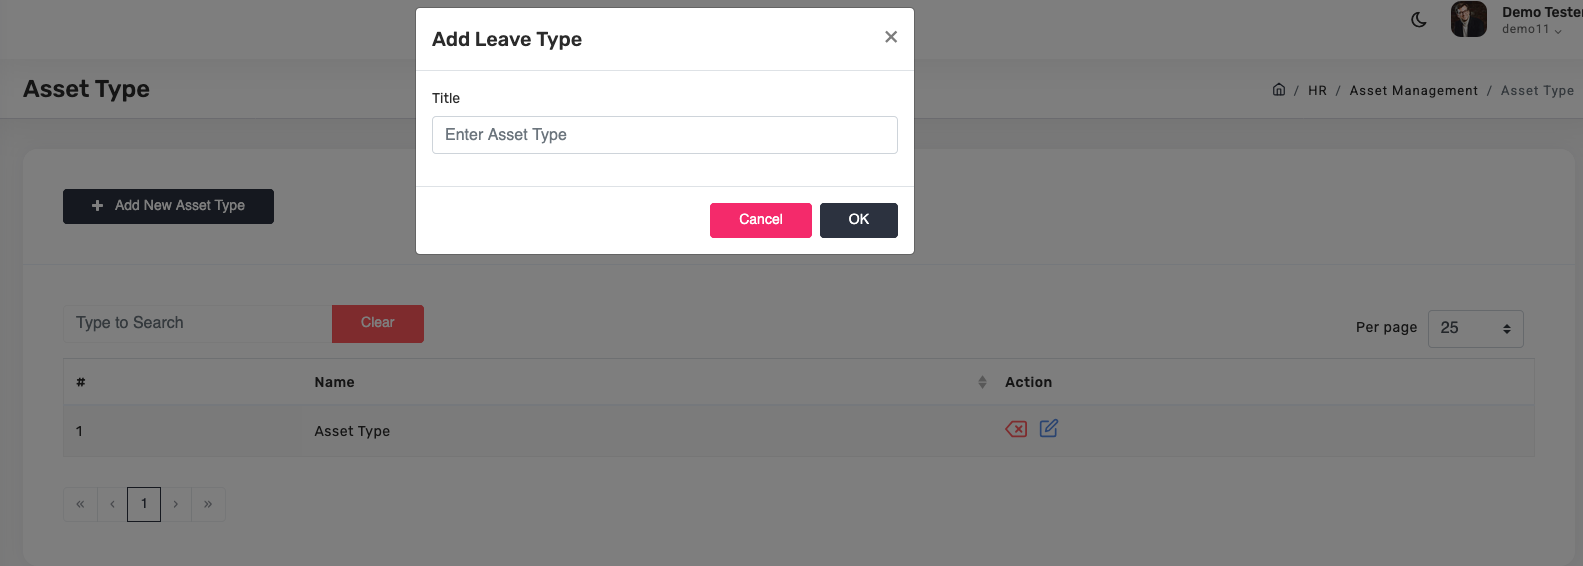
Asset Types
Define the categories your assets fall into via Asset Management → Asset Type → Add New Asset Type.
Training Management
Organize training sessions, register trainers, and track which employees need to attend. Three submenus: Trainings (sessions), Training Types (categories), Trainers (roster).
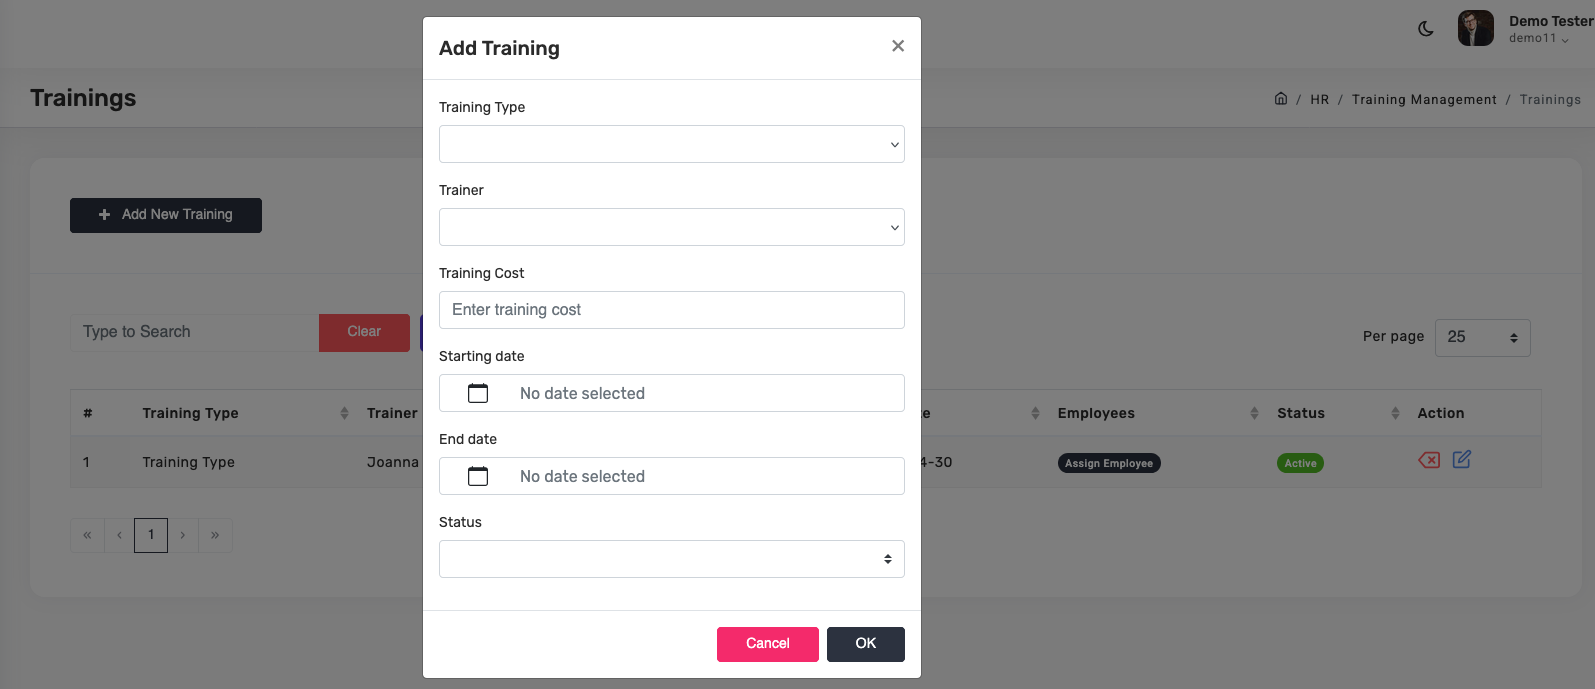
Create a training session
- Navigate to
HR & Admin → Training Management → Trainings. - Click + Add New Training.
- Pick Training Type (predefined in Training Type submenu).
- Pick Trainer (predefined in Trainers submenu).
- Enter Training Cost, Starting Date, End Date, Status.
- Click OK.
- After saving, click Assign Employee in the table row to pick attendees.
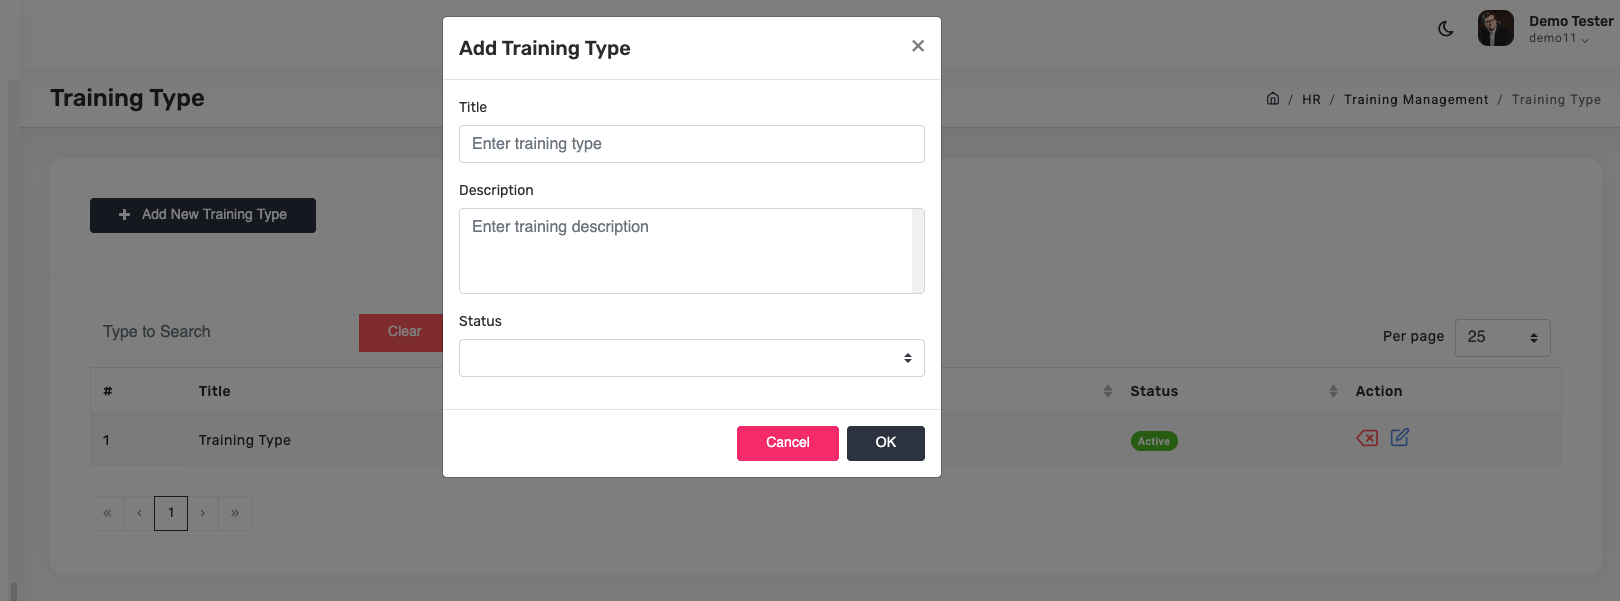
Training Types
Categorize sessions (Technical Skills, Soft Skills, Safety Training). Setting these up first keeps the Trainings dropdown consistent.
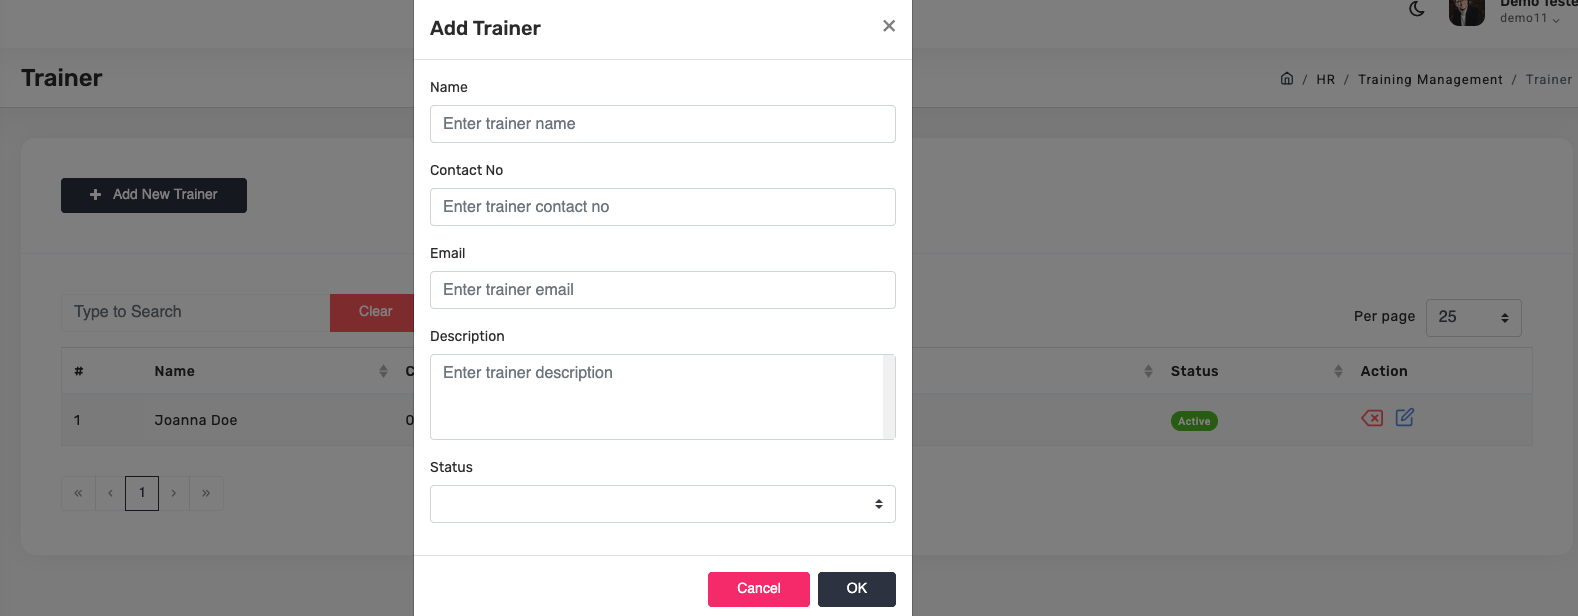
Trainers
Register trainers before assigning them to sessions. Each trainer has Name, Contact No, Email, Description (area of expertise), and Status.
Requisition, Grievance, Ticket
Three internal channels for employees to reach HR or admin — each purpose-built for a specific kind of request.
Requisition — formal resource requests
Handles internal requests for assets, approvals, or travel. Go to HR & Admin → Requisition → Add New Requisition.
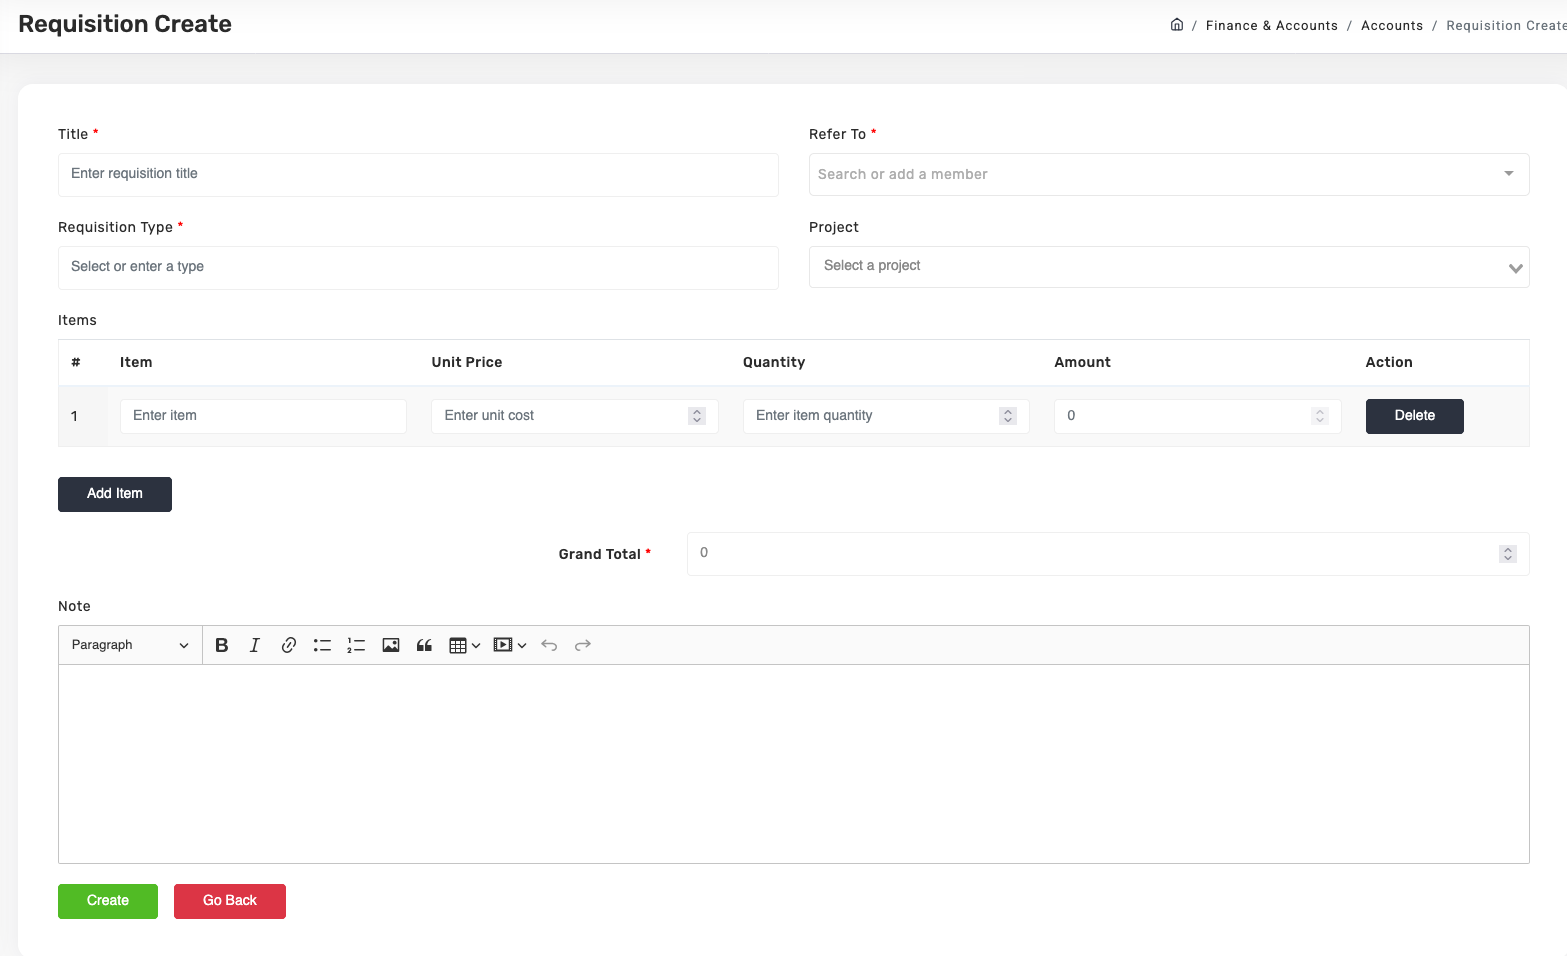
Fill Title, Refer To, Requisition Type (Resource, Asset, Travel), Project, add itemized rows with amounts, Note. Submit and track status: Pending → Approved or Rejected.
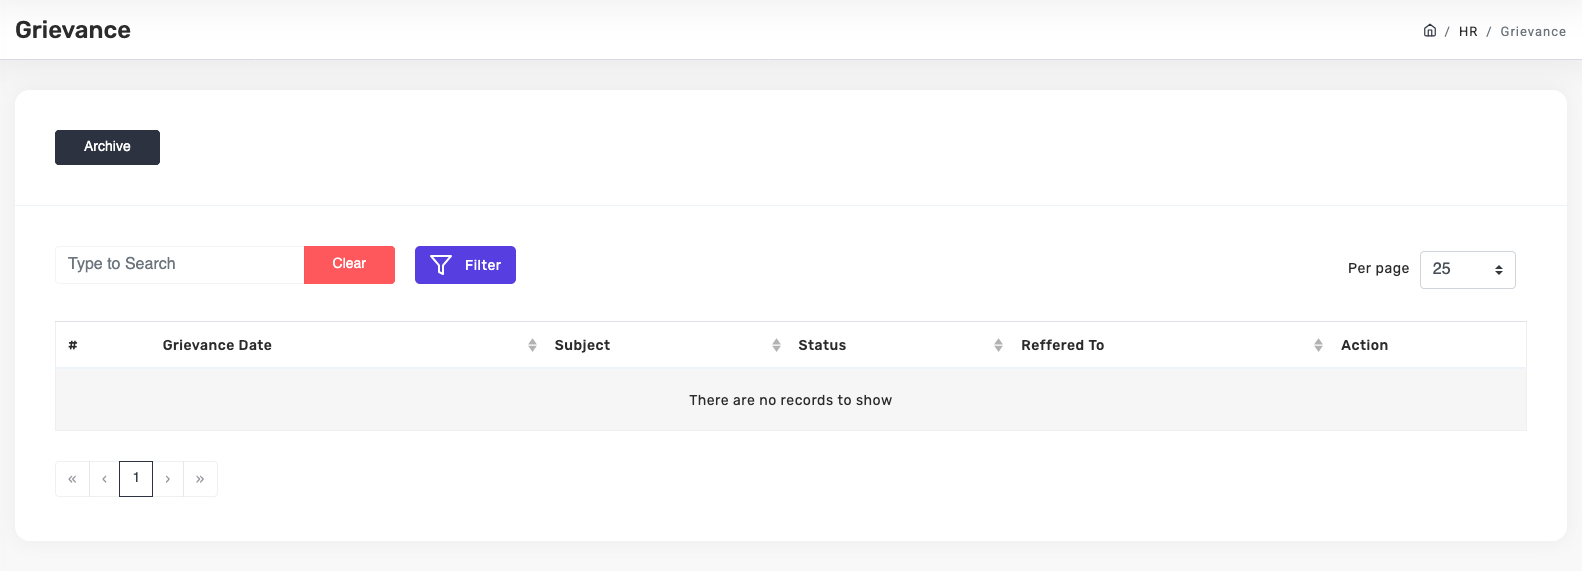
Grievance — workplace complaints
Review employee-submitted grievances with full status tracking. Date, subject, status, and who it was referred to are visible in the table.
Ticket — technical / admin help
Admins see every ticket raised in the company. Change the status and priority of any ticket, and comment with @user references.
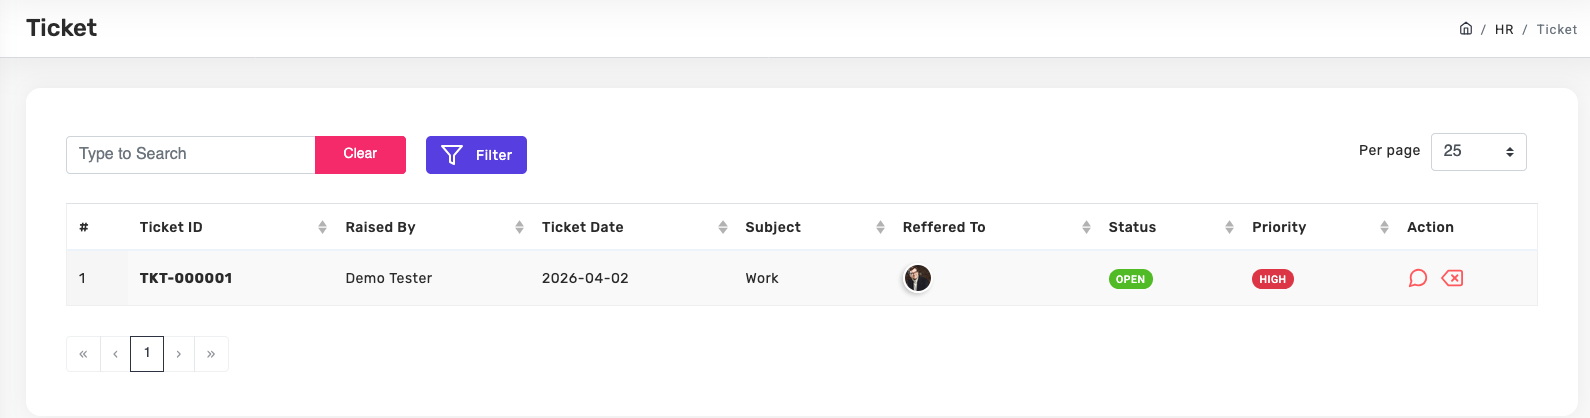
Status and priority flow. Status: Open → Closed. Priority: Low → Medium → High.
Activity Log & Security
The complete audit trail — every action in Smicee is logged with user, timestamp, and context.
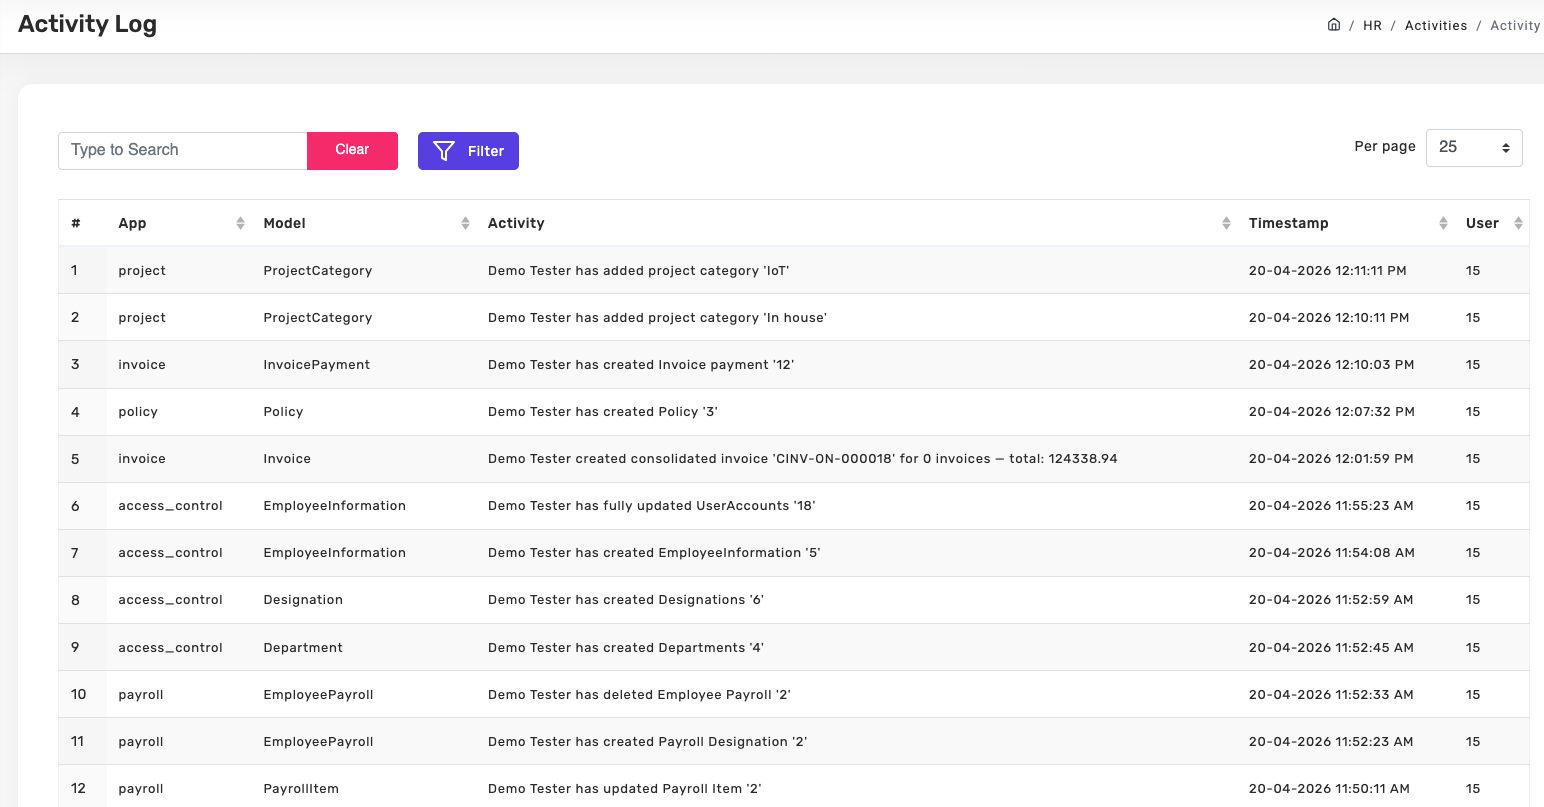
Activity Log
Navigate to HR & Admin → Activity Log. Each entry shows App (which module), Model (which record type), Activity (what happened), Timestamp, and User (who did it).
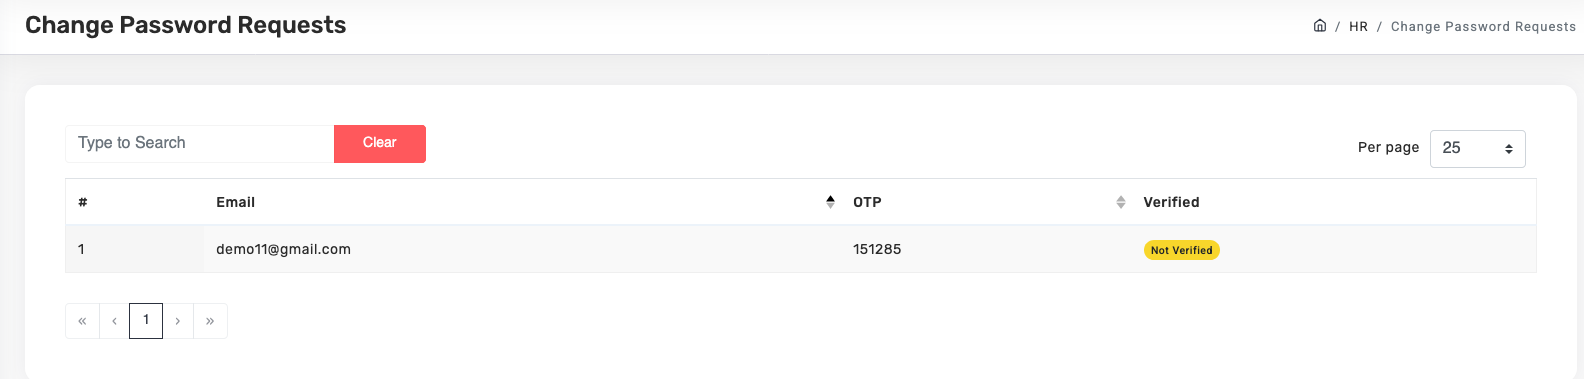
Change Password Requests
Admins can access the list of password reset requests at Organization → Change Password Requests with OTP code and verification status.
Common UI patterns
Once you know these five patterns, the whole system feels smaller. Every module uses them.
List-then-detail
Almost every module opens with a searchable, filterable list. Click + Add New [thing] to create. Click a row to view or edit.
Submit / Save as Draft / Go Back
Most forms have Submit and Go Back. Some also have Save as Draft. Nothing sends until you hit Submit.
Status lifecycle
Requests go through: Pending → Approved (or Rejected). Tickets use: Open → Closed, with priority Low → Medium → High.
Referring To
When you submit something that needs approval (leave, ticket, requisition), pick who should approve it in Referring To. Default to your direct manager unless instructed otherwise.
Breadcrumb navigation
The breadcrumb in the top right (e.g., My Workspace / EOD / EOD Report Submit) shows your location and is clickable — quick way to navigate back.
Glossary
Boarding Type — A category of onboarding (Full-Time, Contractor, Intern) used to bundle the right policies and compliance documents automatically.
BIN / TIN — Business Identification Number and Taxpayer Identification Number. Set in Organization Settings; appear on payroll and invoices.
EOD — End-of-Day report. Daily activity log submitted by each employee to their manager.
Present Ratio — The cumulative count of Present days over total days in the month, shown on the Attendance grid. Drives payroll calculations.
Referring To / Refer To — The person or team responsible for approving a submitted request.
RFP — Request for Proposal. Formal vendor sourcing process tracked under Procurement.
PO Value / PO VAT / PO AIT — Purchase Order Value and its associated VAT (Value Added Tax) and AIT (Advance Income Tax) amounts — used on Projects.
Inclusion / Deduction — On Payroll Items, Inclusions (+) add to salary (Basic, House Rent), Deductions (−) subtract (Tax, Loan).